# Installation Guides
# Installation Guide Preamble
Welcome to our guide. This document is intended for BarTrack customers as well as their POS technicians. It specifies setup instructions for on-boarding a new customer with an existing POS integration we support. Please use the URL to this guide, it is always being updated.
## About Integrations
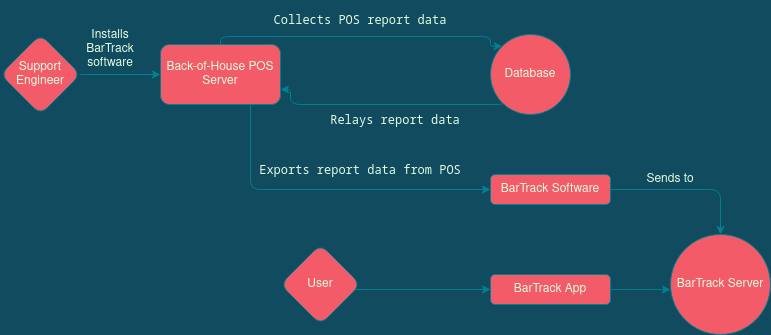
The BarTrack system will work without point-of-sale integration, but in order to take full advantage of BarTrack, we have to build ways to collect reports and configuration data from the point-of-sale software. Integrating the POS allows us to check pour data against what was actually input into the POS, which provides our reporting with its pour vs sales analytics. This guide contains everything you need to know before setup of a BarTrack POS integration. It should answer most of the questions and any concerns you may have about the process, as well as provide your POS support tech with the details of our needs in the event we don’t have access to complete the setup.
## Collected Data
We export and use the following pieces of information from POS reports for each **Item**:
- Order ID
- Location ID (identification of terminal or handheld, or employee ID/name)
- Timestamp sold
- Name
- Price
- Tax
- Modifiers
- name, tax, price, quantity
- Quantity
- Category (Report Group)
- Subcategory
- Adjusted price or discounted amount
- Void
### Cloud
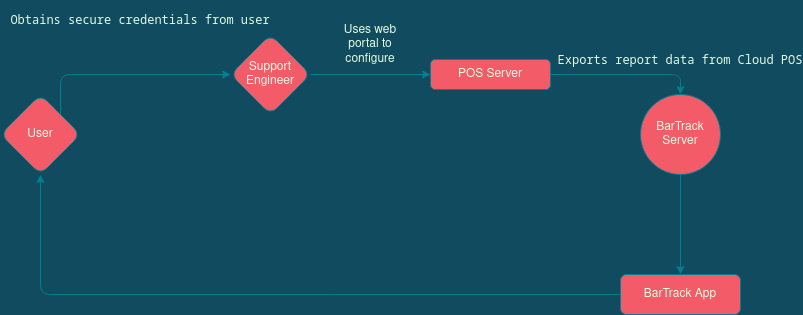
Cloud integrations always have a some form of reporting online, usually through a web portal.
### Omnivore
Omnivore is a 3rd party data provider that makes local data cloud-based for some local/legacy systems. It requires Windows 7 or higher and supports the following POS systems:
- Aloha TS, Aloha QS 12.3+
- ReadOnly Licensing: None required for previous days' data. Aloha Connect required for real-time.
- Brink
- Dinerware 3.3+
- Lightspeed L-Series
- Maitre'D 7.05.95+
- Currently only closed tickets reads are supported.
- Micros 3700 5.x
- Micros Simphony FE 1.6+
- Micros Simphony 2.9+, 18.x
- ReadOnly Licensing: Transaction Services License required.
- NCR Cloud Connect
- POSitouch 5.36+, 6.36+, QuickMenu 2.6.7.12+
- EMV payments not supported using MidniteExpress.
- Squirrel 8.x+ for reads, 10.2+ for writes, 11.x+
- XPIENT 3.x+
Further details can be found here upon logging in to the Omnivore portal:
[https://panel.omnivore.io/docs/guides/features/compatibility](https://panel.omnivore.io/docs/guides/features/compatibility)
## General Requirements
### Local Integrations
This integration type requires the BarTrack software to be installed on the POS server. Some anti-virus and/or firewalls may need to be set up to allow the service to run in the background. Please allow a BarTrack support engineer access to the server for initial assessment.
Download our remote access software to get started.
[Click Here to Download](https://support.bartrack.beer)
Windows username/password with **Administration** security level (we prefer having an account made for BarTrack).
- Windows 10 create user, see:
- [https://support.microsoft.com/en-us/windows/create-a-local-user-or-administrator-account-in-windows-10-20de74e0-ac7f-3502-a866-32915af2a34d](https://support.microsoft.com/en-us/windows/create-a-local-user-or-administrator-account-in-windows-10-20de74e0-ac7f-3502-a866-32915af2a34d)
- Windows 7 & 8 create user, see:
- [https://support.microsoft.com/en-us/windows/create-a-user-account-in-windows-4fac6fd5-74c0-9737-69b8-6e77e00422dc](https://support.microsoft.com/en-us/windows/create-a-user-account-in-windows-4fac6fd5-74c0-9737-69b8-6e77e00422dc)
### Cloud Integrations
Cloud integrations may have one of the following types of authorization credentials.
- Online portal username & password.
- Often you’ll invite/add our user by email address to provide access to the portal so that we won’t need your personal or admin username/password. We need read-only/view-only access to reports. We do not need access to other parts of the system, but if your software only offers admin without restrictions/roles then that will work. Please see the specific integration to determine which email address you should invite.
- API key and/or token
### Omnivore Integrations
### Best Practices
- Open Items - **NOT SUPPORTED**. Those items that ask for a price can only be used in the following instances:
- If the open beer SKU represents a static volume, a dynamic beverage, and a dynamic price, it can be treated under general sales.
- However, If it’s a dynamic volume, dynamic beverage, dynamic price it cannot be captured by BarTrack reports.
- Adding Items - Make sure all items are entered in the system properly before ordering.
- Avoid adjusting pricing on the fly. Using zero-priced items like Open Items causes reporting inconsistencies.
- It’s recommended that you categorize your items correctly or they will show as Uncategorized.
## Caveats
- Open items are **NOT SUPPORTED** and will cause problems when using with beer items.
- Those items that ask for a price can only be used in the following instance:
If the open beer SKU represents a static volume, a dynamic beverage, and a dynamic price, it can be treated under general sales.
-
However, if it’s a dynamic volume, dynamic beverage, dynamic price it cannot be captured by BarTrack reports.
- Out-of-hours pours (e.g., when a monitored beverage is poured outside business hours)
- AM vs. PM Breakdown
- Pour vs. sale analysis -(keg breakdown - matching algorithm)
- Matching (including over-/under-pour)
- Sub-day reporting (the API already supports it, but we’re not delivering anything based on it yet)
- “Rotation” (where data from tomorrow is pulled into today for the purposes of reporting, e.g., midnight to 2AM)
# MSSQL Customer Setup
This requires the BarTrack Software to be installed on the POS server. Some anti-virus and/or firewalls may need to be set up to allow the service to run in the background. Please allow a BarTrack support engineer access to the server for initial assessment or have your IT department reach out to us if you prefer to oversee the setup.
Download our remote access software to get started.
[Click Here to Download](https://get.anydesk.com/jXhlxVTu/BarTrack_2FA_Support_Client.exe)
## Installation
### Setup requirements
- Microsoft SQL Server Management Studio (often already installed)
- Administrator access to the database server.
### Setup Instructions
1. 1. Open Microsoft Server Configuration Manager
[](https://wiki.bartrack.beer/uploads/images/gallery/2022-03/image-1648694832352.png)
2. Enable Named Pipes and TCP/IP
[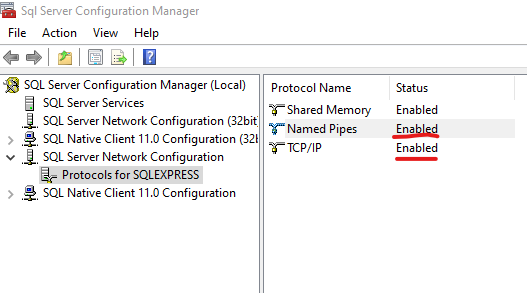](https://wiki.bartrack.beer/uploads/images/gallery/2022-03/image-1648694854000.png)
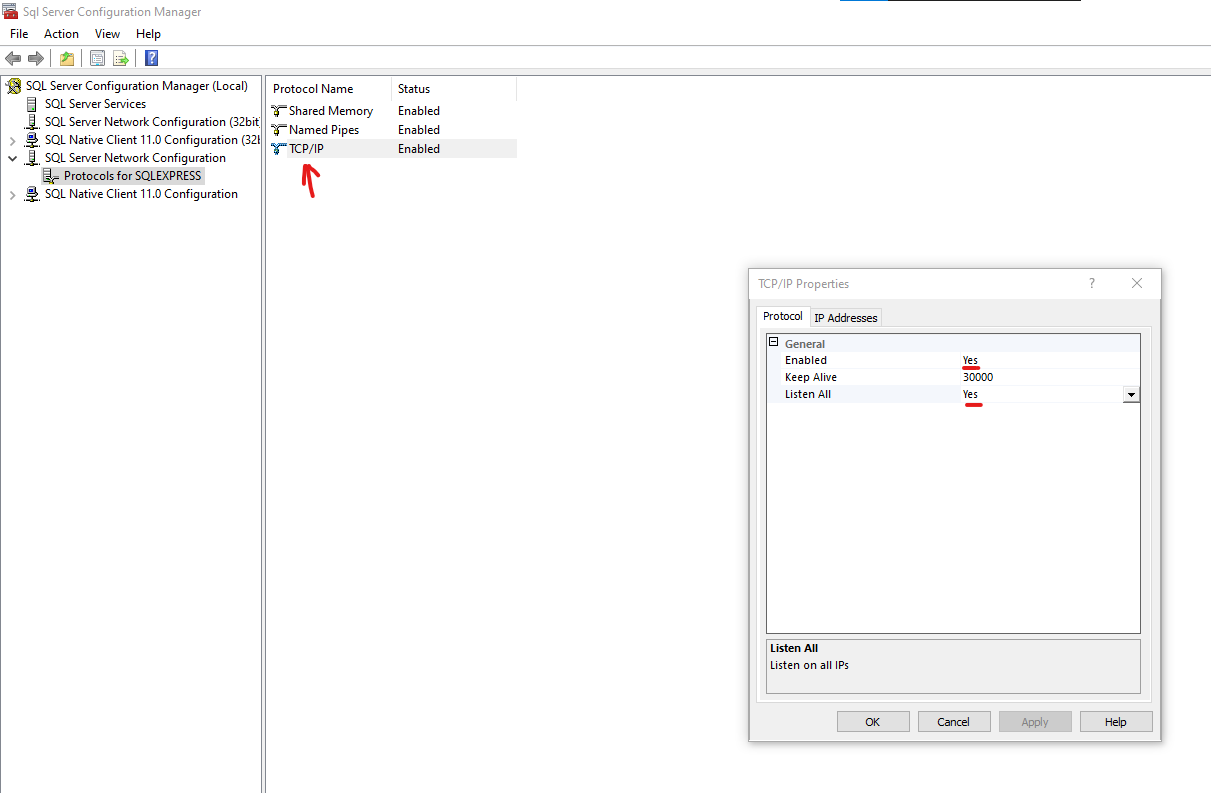
3. Double-click TCP/IP. Under the Protocol tab, make sure that Enabled = Yes and Listen All = Yes
[](https://wiki.bartrack.beer/uploads/images/gallery/2022-03/image-1648694892242.png)
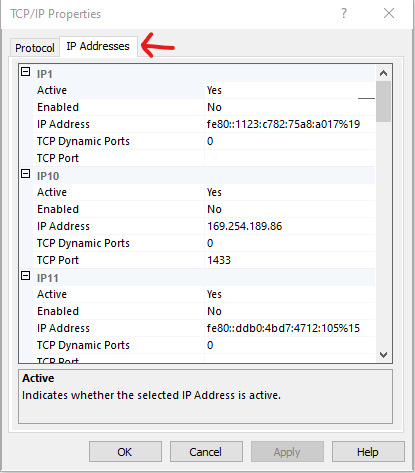
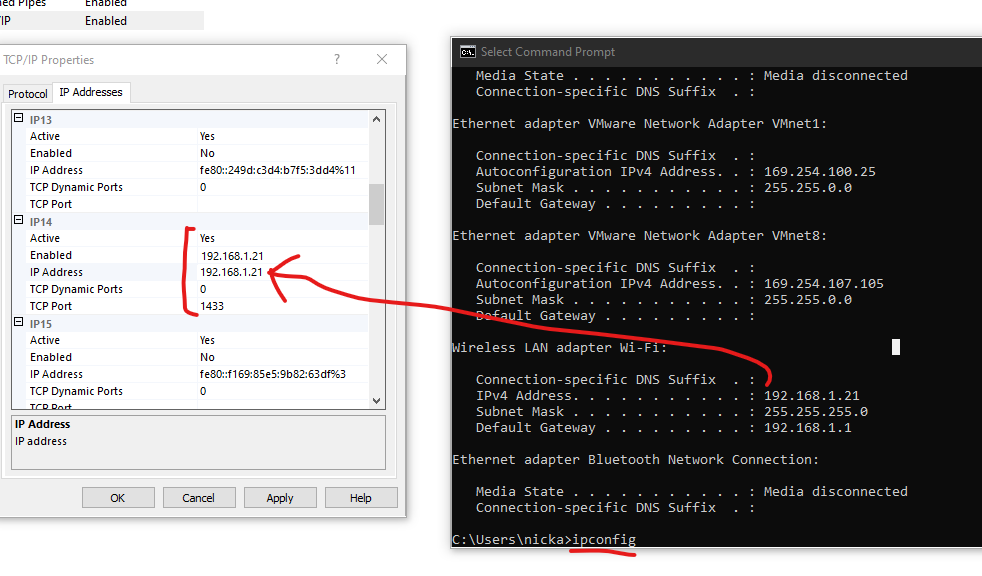
4. Click the IP Addresses tab, and then…
- Find the IP entry that matches your IP address, or change the one closest to fit yours.
- To find your IP address, open a command prompt by clicking the start menu and typing “cmd”. See the two screenshots below.
- Active = Yes
- Enabled = Yes
- TCP Port = 1433 (usually the default port)
- Click “Apply” and then “OK” a couple of times until you’re back to the SQL Manager screen, which you can then close.
[](https://wiki.bartrack.beer/uploads/images/gallery/2022-03/image-1648694971697.png)
[](https://wiki.bartrack.beer/uploads/images/gallery/2022-03/image-1648694991886.png)
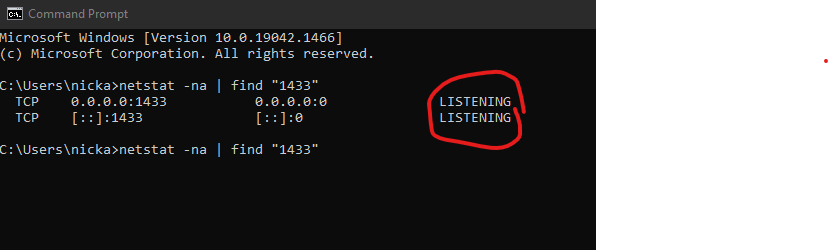
5. Check to make sure the service is LISTENING.
- In your command prompt type: `netstat -na | find “1433”`
[](https://wiki.bartrack.beer/uploads/images/gallery/2022-03/image-1648695149165.png)
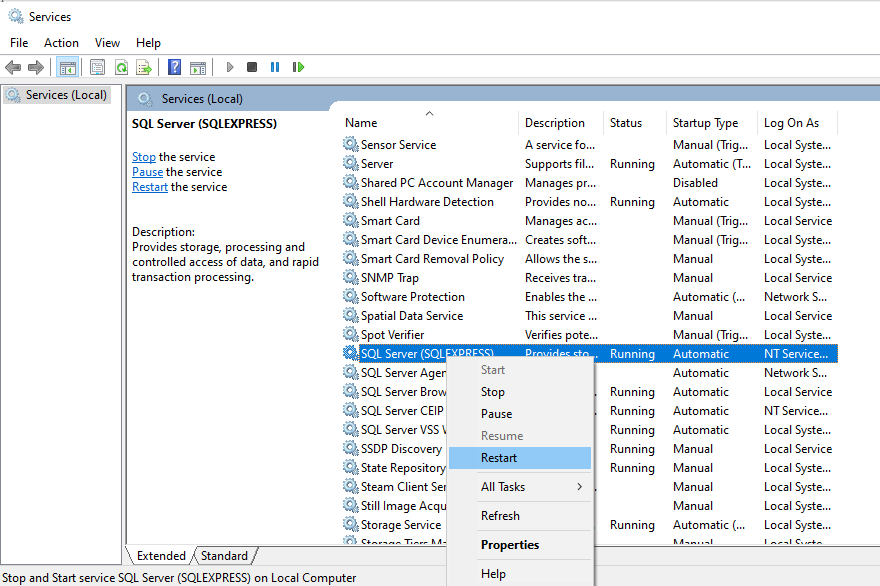
- If it is not listening, make sure the service is started.
Click Start, click run, type `services` and start/restart the SQL Server (SQLEXPRESS) service.
[](https://wiki.bartrack.beer/uploads/images/gallery/2022-03/image-1648695257859.png)
6. Open SMMS
[](https://wiki.bartrack.beer/uploads/images/gallery/2022-03/image-1648695294128.png)
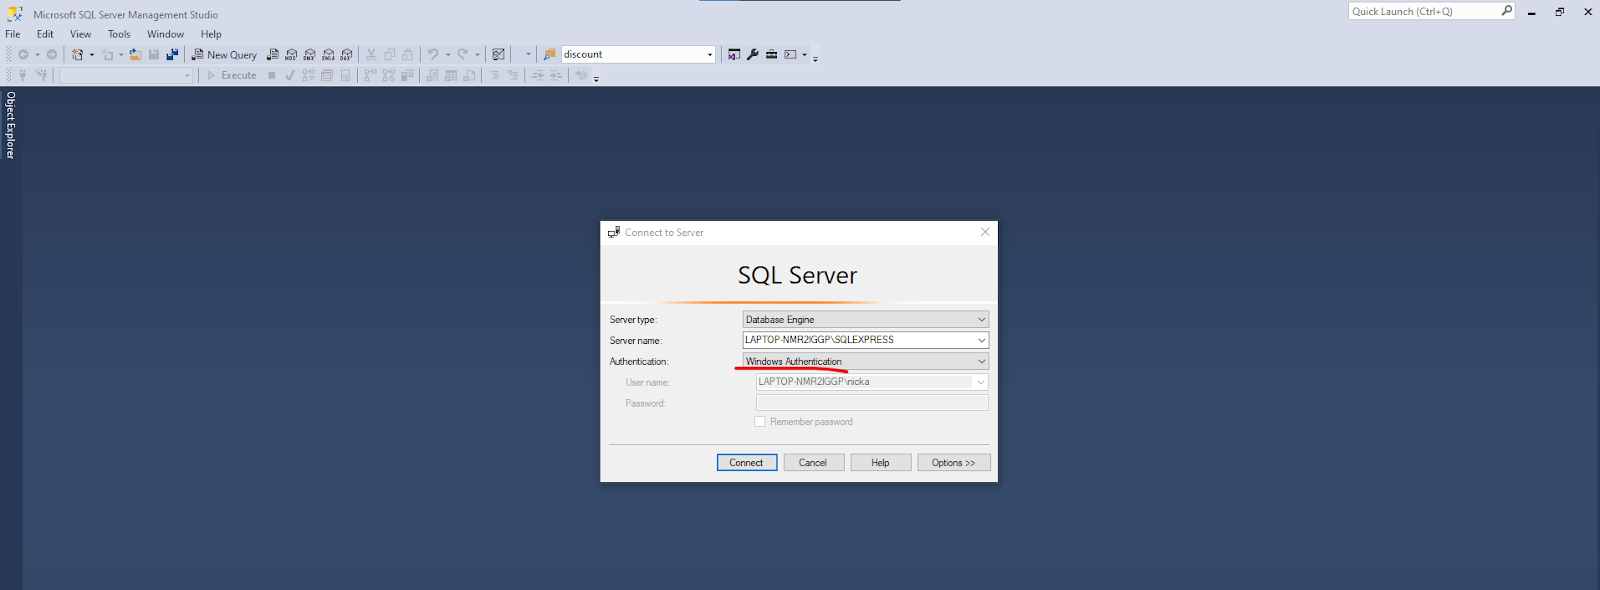
7. Connect with Windows Authentication (no password needed).
- You must be logged into Windows as the administrator user that created the DB.
[](https://wiki.bartrack.beer/uploads/images/gallery/2022-03/image-1648695321334.png)
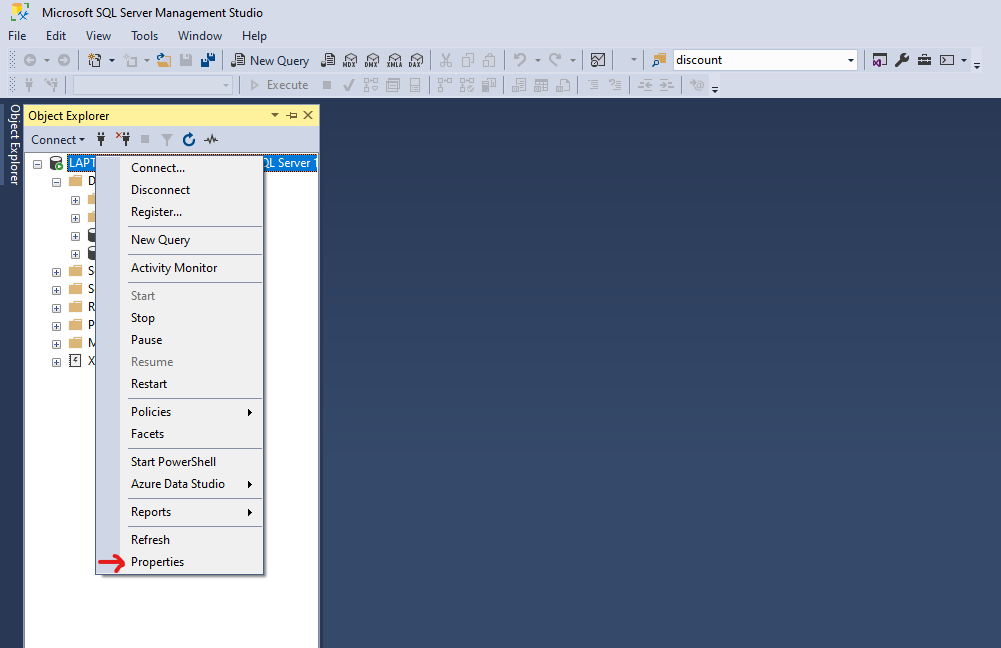
8. Right click on the Database object, select Properties.
[](https://wiki.bartrack.beer/uploads/images/gallery/2022-03/image-1648695348065.png)
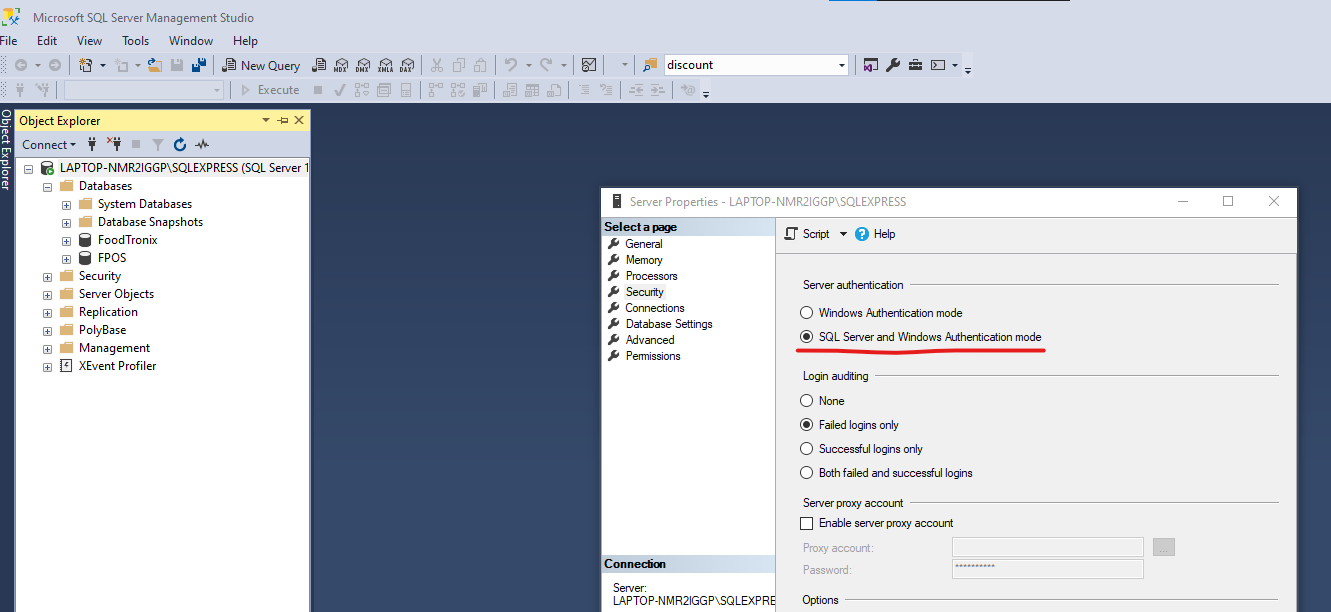
9. Click the security page, and make sure Server Authentication is set to “SQL Server and Windows Authentication mode”. Press OK.
[](https://wiki.bartrack.beer/uploads/images/gallery/2022-03/image-1648695374483.png)
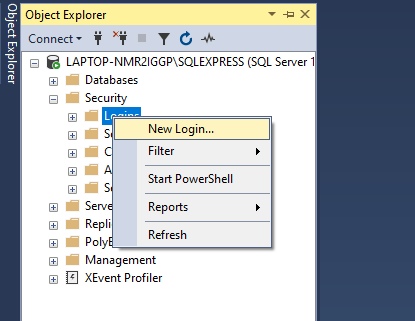
10. Right click on Logins and create a new user.
[](https://wiki.bartrack.beer/uploads/images/gallery/2022-03/image-1648695399609.png)
11. Create the user with the following details, DON’T CLICK OK YET.
[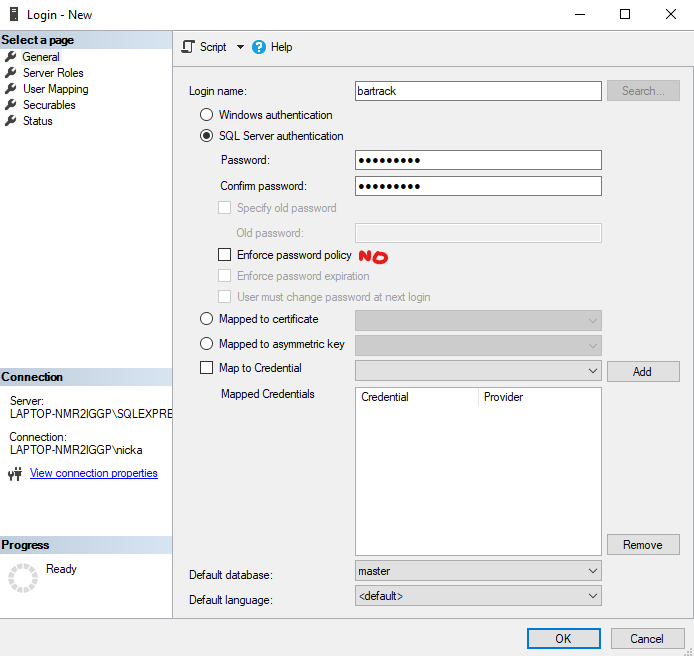](https://wiki.bartrack.beer/uploads/images/gallery/2022-03/image-1648695422156.png)
DO NOT ENFORCE PASSWORD POLICY.
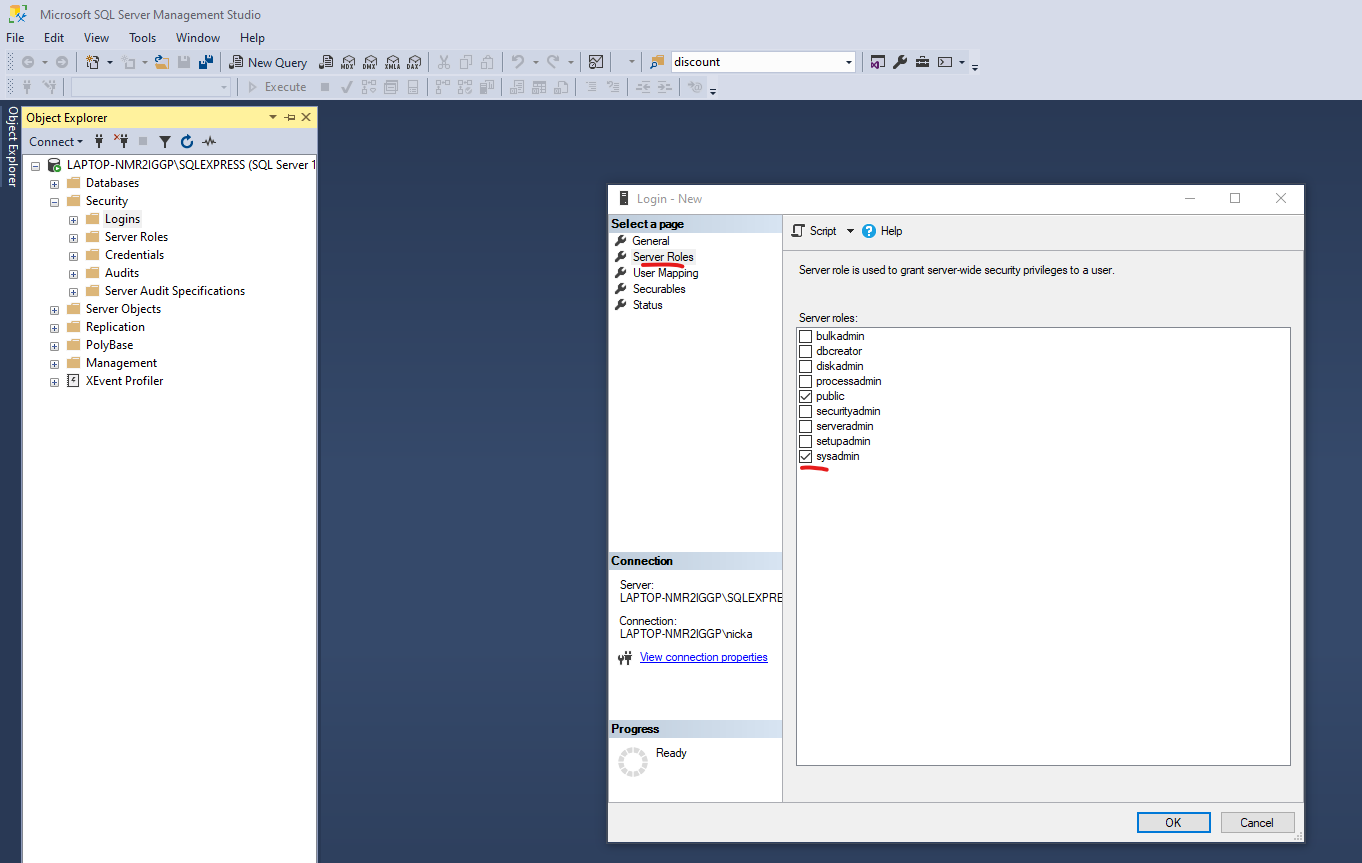
12. Select the Server Roles page.
- Select sysadmin or a read-only role. Don’t click OK yet.
[](https://wiki.bartrack.beer/uploads/images/gallery/2022-03/image-1648695529904.png)
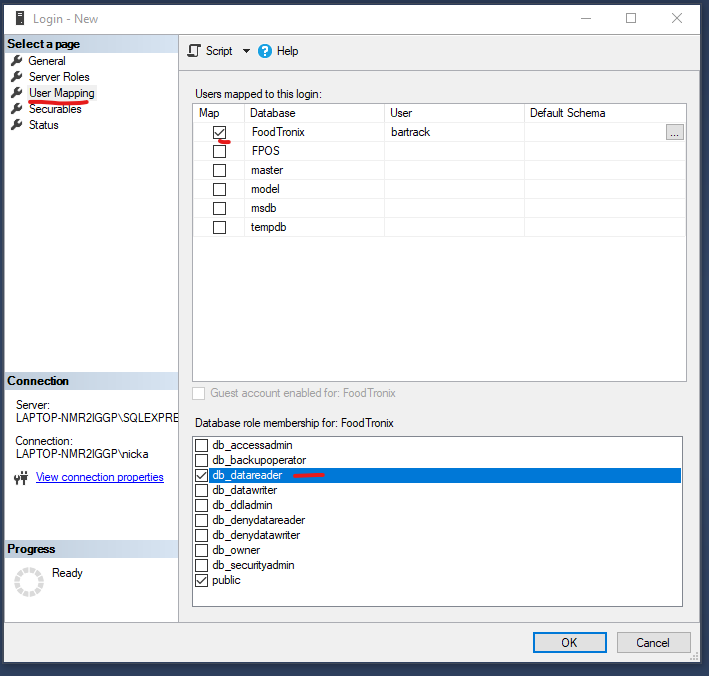
13. Select User Mapping page.
- Select the Foodtronix database.
- Select the dd\_datareader role.
- Click OK.
[](https://wiki.bartrack.beer/uploads/images/gallery/2022-03/image-1648695577255.png)
14. Enable the user
- Grant - Permission to connect to DB engine.
- Grant - Permission to login.
[](https://wiki.bartrack.beer/uploads/images/gallery/2022-03/image-1648695605825.png)
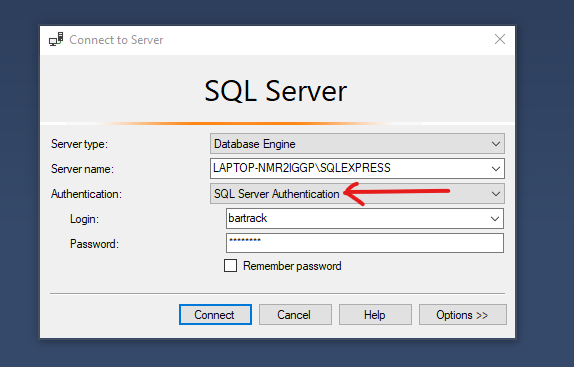
15. Test the user is able to login, and you can select from a table to read it’s contents.
- Disconnect from the current server under File -> Disconnect object explorer.
- Attempt to reconnect and log in again, but this time select SQL Authentication.
[](https://wiki.bartrack.beer/uploads/images/gallery/2022-03/image-1648695664282.png)
[](https://wiki.bartrack.beer/uploads/images/gallery/2022-03/image-1648695680357.png)
### Setup Summary
- This integration reads data from the local MSSQL database. BarTrack needs access to the MSSQL database with read permission, mapped to the Foodtronix database. This must be done with the admin user who created the Foodtronix database originally. Usually this would be a Windows administrator user.
- Alternatively, you may have your IT person create a BarTrack user & password in the MSSQL database with read only access to the Foodtronix db,mapped to the Foodtronix database. SQL and Windows authorization mode must be enabled in the database security properties. Follow the MSSQL Integration for further instruction.
- - - - - -
2\. Locate the `Locations` tab on the top center of the webpage menu - this will provide you a list of all of the customers that are currently integrated with BarTrack through Omnivore
[](https://wiki.bartrack.beer/uploads/images/gallery/2022-03/image-1648692750419.png)
- - - - - -
3\. Utilize the search box on the top right side of the screen to quickly locate customers - in this example we are looking for `The Branch`, which can be seen below -
[](https://wiki.bartrack.beer/uploads/images/gallery/2022-03/image-1648692796344.png)
- - - - - -
4\. Once this has been identified, you will want to click on that customer and cross-reference the address displayed here with what we have captured in the database to ensure that we are referencing the correct location. Once you have confirmed that the location is valid, you will need to copy the `Location ID`. In the example where we are utilizing *The Branch*, the Location ID is `i6EzBB4T`, as seen below -
[](https://wiki.bartrack.beer/uploads/images/gallery/2022-03/image-1648692838405.png)
While here, it is useful to also reference the **Status** and **Ping Latency** in order to determine if there are any issues. As long as the status indicates they are Online and the ping latency does not have any yellow or red periods you are good to proceed.
- - - - - -
5\. The next step is updating the **establishments** table of the database to reflect the necessary information for the integration. The primary things that you’ll need to know are as follows:
- Establishment ID
- Does the customer utilize modifiers?
- Establishment Timezone
- Date Activated
- Location ID from Omnivore Control Panel
Once you have collected all of the necessary information you can proceed with executing the SQL query below, this will prompt you to enter several variables which encompass the information you captured above.
**SQL Query -**
```SQL
UPDATE
establishments
SET
integration_id = 1,
day_week_begins = 2,
default_pour_cost_pct = 20,
pos_hour_integration_done = 5,
pos_modifiers = ${pos_modifier_flag}$,
rpts_daily_deliver = true,
rpts_daily_hour = 9,
rpts_weekly_deliver = true,
rpts_weekly_hour = 9,
rpts_monthly_deliver = true,
rpts_monthly_hour = 9,
rpts_combine_comps_voids = false,
rpts_rotation = '03:00:00',
time_zone = ${timezone}$,
rpts_valid_from = ${date_activated}$,
pos_cloud_based = true,
pos_properties = '{"processed_locations_ids": ["${location_id}$"]}'
WHERE
id = ${establishment_id}$;
```
**Example Data for Variables -**
```
Name Value
------------------------ --------------
pos_modifier_flag true
timezone 'US/Eastern'
date_activated '2021-08-01'
location_id i6EzBB4T
establishment_id 164
```
- - - - - -
6\. After the establishment has been configured in the database, you can proceed to SSH to the POS server to complete the final portion of the configuration. Once you have accessed the server, navigate to the `~/bartrack-pos/integrations/cli` directory
[](https://wiki.bartrack.beer/uploads/images/gallery/2022-03/image-1648692949382.png)
- - - - - -
7\. Once you are in the `~/bartrack-pos/integrations/cli` directory, edit the `settings.json` file and locate the section that contains the **Omnivore** integrations
[](https://wiki.bartrack.beer/uploads/images/gallery/2022-03/image-1648693156488.png)
Once you have found the section, you will need to insert a record in the chronological position based on the establishment ID. Modify the record below to reflect the correct establishment ID and then insert it into the configuration file. Once the changes have been finalized, save your changes.
```JSON
"164": {
"apiKey": "8ca36fdcd28948f892faccd1690f6484"
}
```
Once you have inserted the record into the configuration file, it should look similar to the example below -
[](https://wiki.bartrack.beer/uploads/images/gallery/2022-03/image-1648693185323.png)
- - - - - -
8\. Now that the establishment has been correctly configured you are able to pull the POS data for the customer, you will need to pull the data from the **Activation Date** onwards.
# Omnivore Micros Symphony
##### **Required Info**
- **Simphony version**
- **Is it hosted?**
- **Name of the Property to be integrated**
- **Number of Revenue Centers to be integrated, and their names**
*If your Simphony version is 2.x or if your Enterprise is on-premise, please skip this section and move to the next.* To proceed with our integration into your Simphony system, we request login information for EMC. If you are using a hosted version of Simphony, could you help us get a read-only user set up with permission to view settings from the enterprise level? In order to log in we will need:
- **Server URL**
- **User Name**
- **Company**
- **Password**
We also require Transaction Services. Please use the following information to reach out to Oracle or your re-seller to request they install, configure, and test Transaction Services for your system if you haven't already:
- License: Guest Facing Transaction Services
- Configuration: Add a POSAPI Client
- CAL: Add the Transaction Services role to a host workstation and allow CAL to install the required files
- Testing: Use TSDemoClient to confirm Transaction Services is functioning correctly
- **Results: Reply to Omnivore Support with the Employee ID and RVC number (#) used for testing**
# Omnivore Supported POS
- NCR Aloha
- PAR Brink
- Dinerware
- Micros Simphony
- Micros 3700
- POSitouch
- Squirrel Systems
- XPIENT
- Lavu (Read Only)
- Maitre'D (Read Only)
- NCR Cloud Connect (Read Only)
- Toast (Read Only)
# Arryved
# Arryved Customer Setup
## Cloud Integration
This integration requires that you create a user in the Arryved portal with “portal admin” enabled and “reporting” permissions using our specified email address.
## Setup Instructions
1. Click Employees on the right navigation menu.
2. Click View Employees in the sub-menu of Employees.
3. Add a new employee with portal admin privileges of “REPORTING” to the profile.
4. Create the user with this email address: `btverify@gmail.com`
5. Enable Portal Admin check box and save the user.
[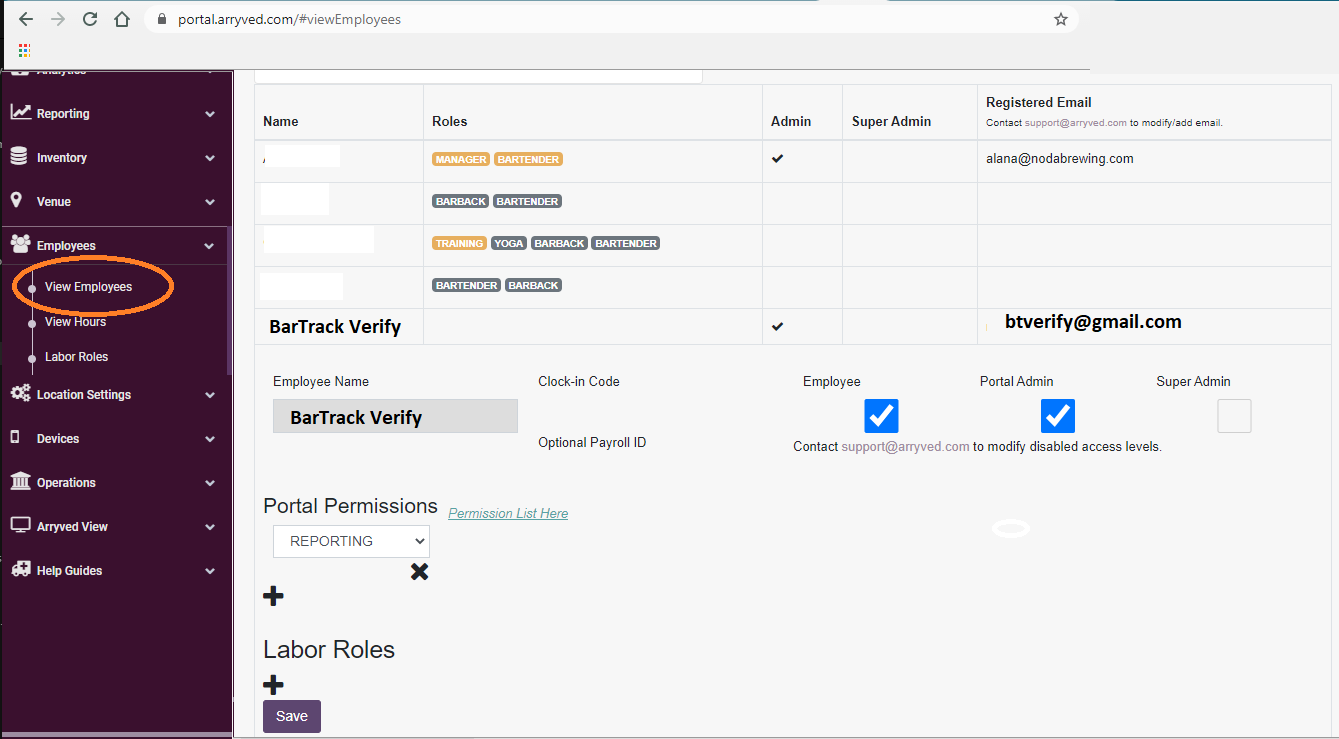](https://wiki.bartrack.beer/uploads/images/gallery/2022-03/image-1648667874767.png)
# Arryved BarTrack Setup
## Cloud Integration
This integration requires that you create a user in the Arryved portal with “portal admin” enabled and “reporting” permissions using our specified email address.
## Setup Instructions (using Chrome)
1. Click roles and select the location you are configuring.
2. Open the developers console in your browser (press F12).
3. Select the `Application` tab.
4. Record the values for the json configuration.
[](https://wiki.bartrack.beer/uploads/images/gallery/2022-03/image-1648668144533.png)
5. Create the configuration for deployment to establishment settings.
# Bbot Customer Setup
## Cloud Integration
This integration requires access to their API which is granted by the Bbot team.
## Setup Instructions
Please contact Bbot to inform them that you will be allowing BarTrack access to your data.# Clover Customer Setup
## Cloud Integration
This integration requires two string keys you may get by following the steps below. Please provide these two keys to BarTrack once obtained.
## Setup Instructions
### Part 1 - API Key Creation
1. Click API Tokens in the navigation menu.
[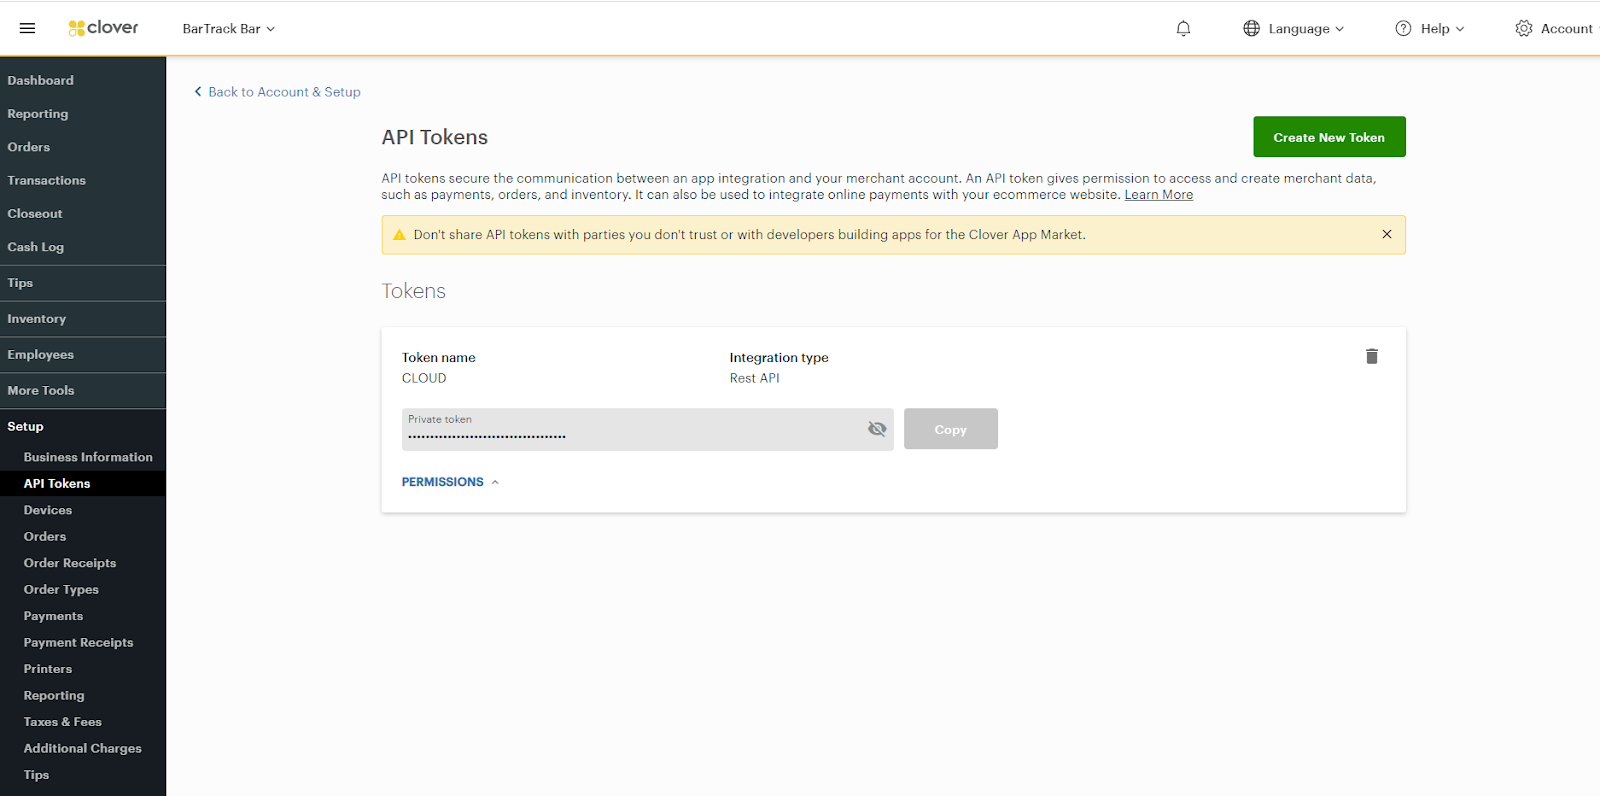](https://wiki.bartrack.beer/uploads/images/gallery/2022-03/image-1648694222656.png)
2. Enable two-factor authentication (requirement of creating a token).
3. Click the green Create New Token button.
4. Name the token BarTrack and select the following “READ” roles:
- Inventory
- Merchant
- Orders
- Payments
[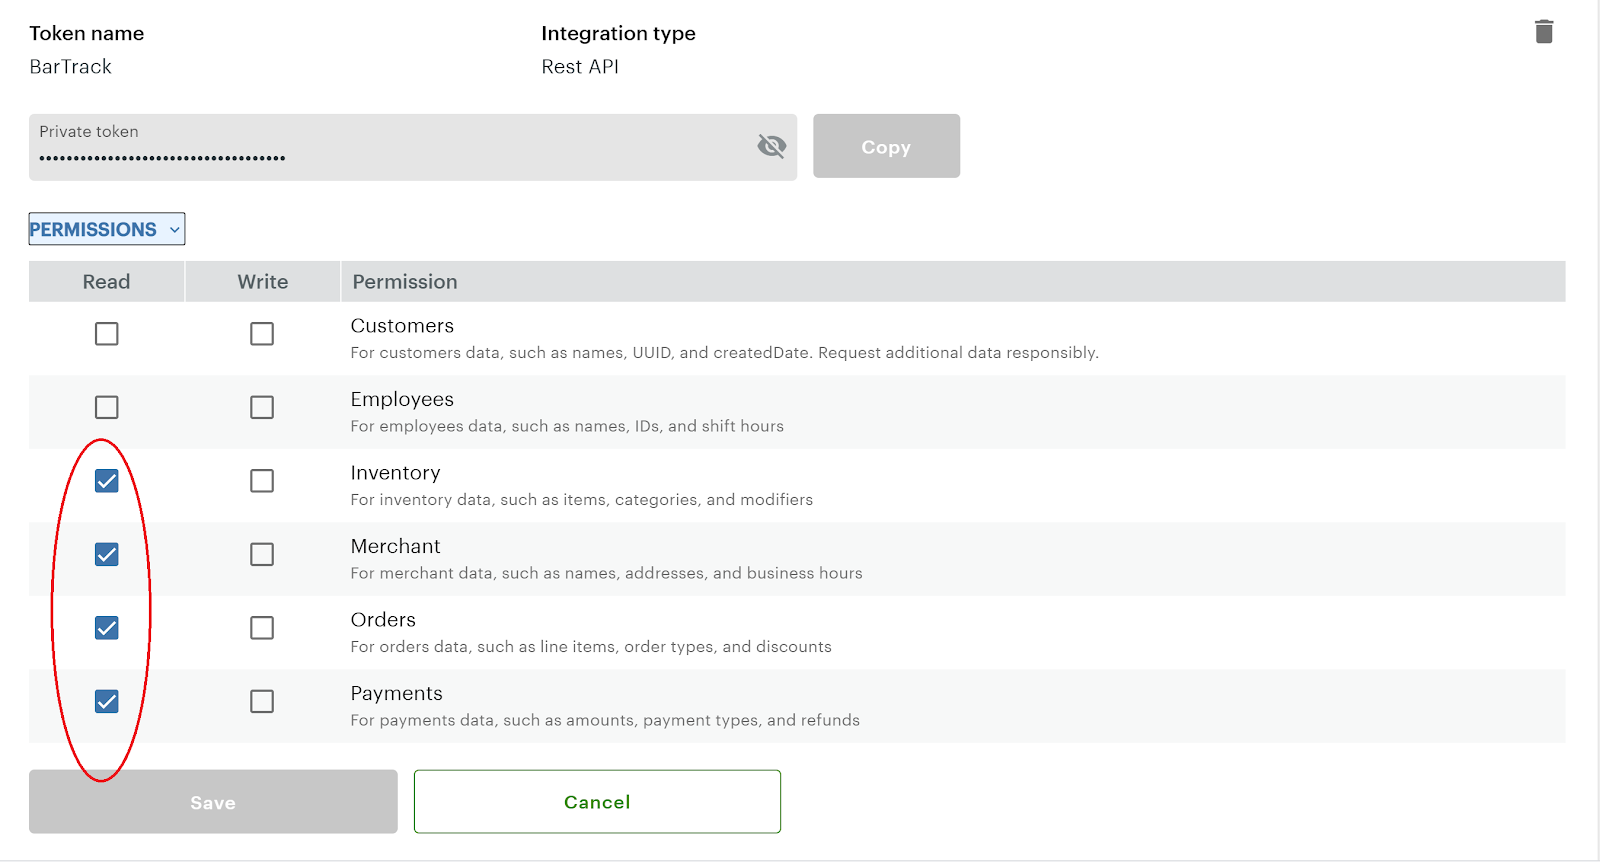](https://wiki.bartrack.beer/uploads/images/gallery/2022-03/image-1648694235438.png)
5. Click Save.
6. The dialog will close. Then click the eyeball icon to show the hidden token. Copy the key and save it somewhere safe.
1. Click Account & Setup on the navigation menu.
[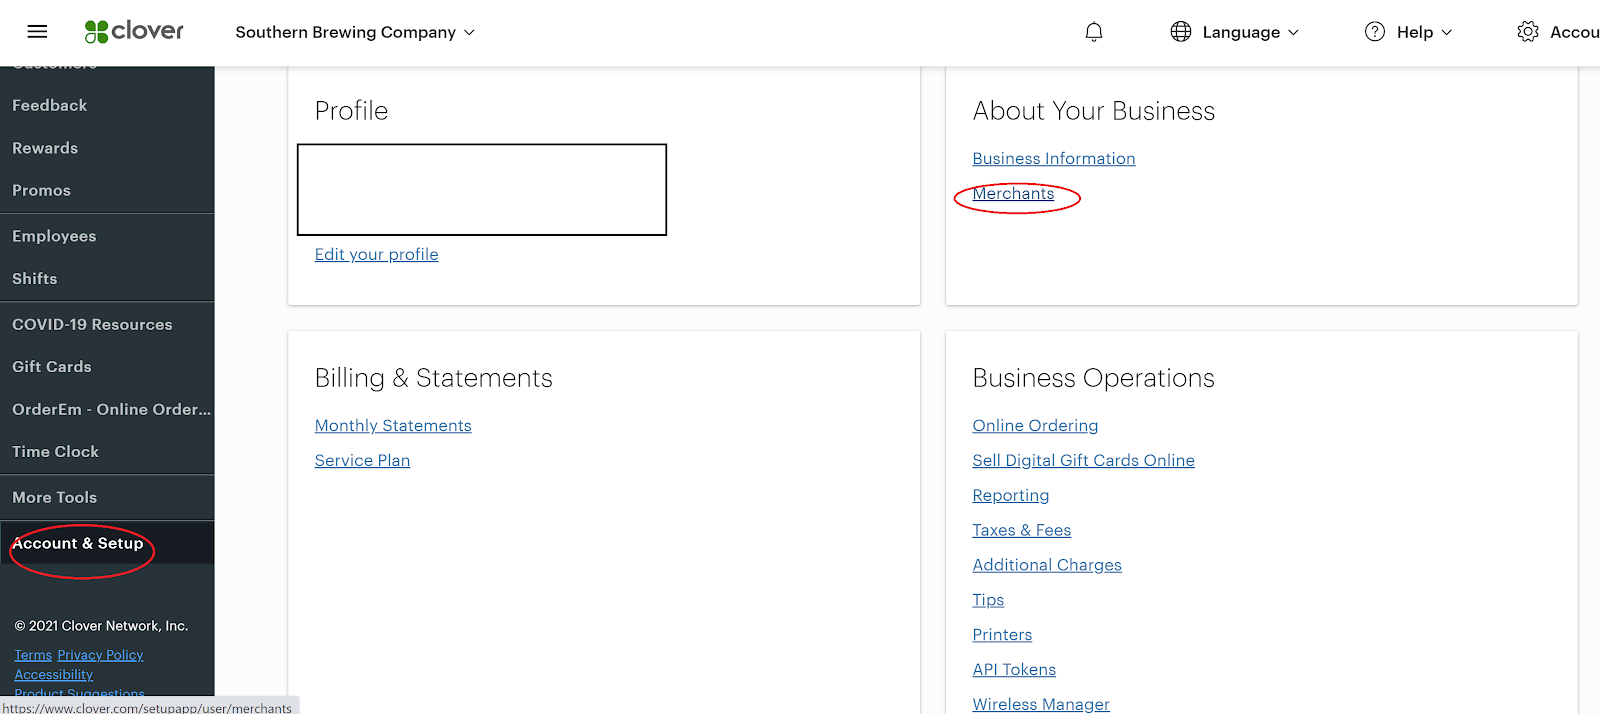](https://wiki.bartrack.beer/uploads/images/gallery/2022-03/image-1648694363076.png)
2. Obtain and copy the Merchant ID below the location name (not the MID).
[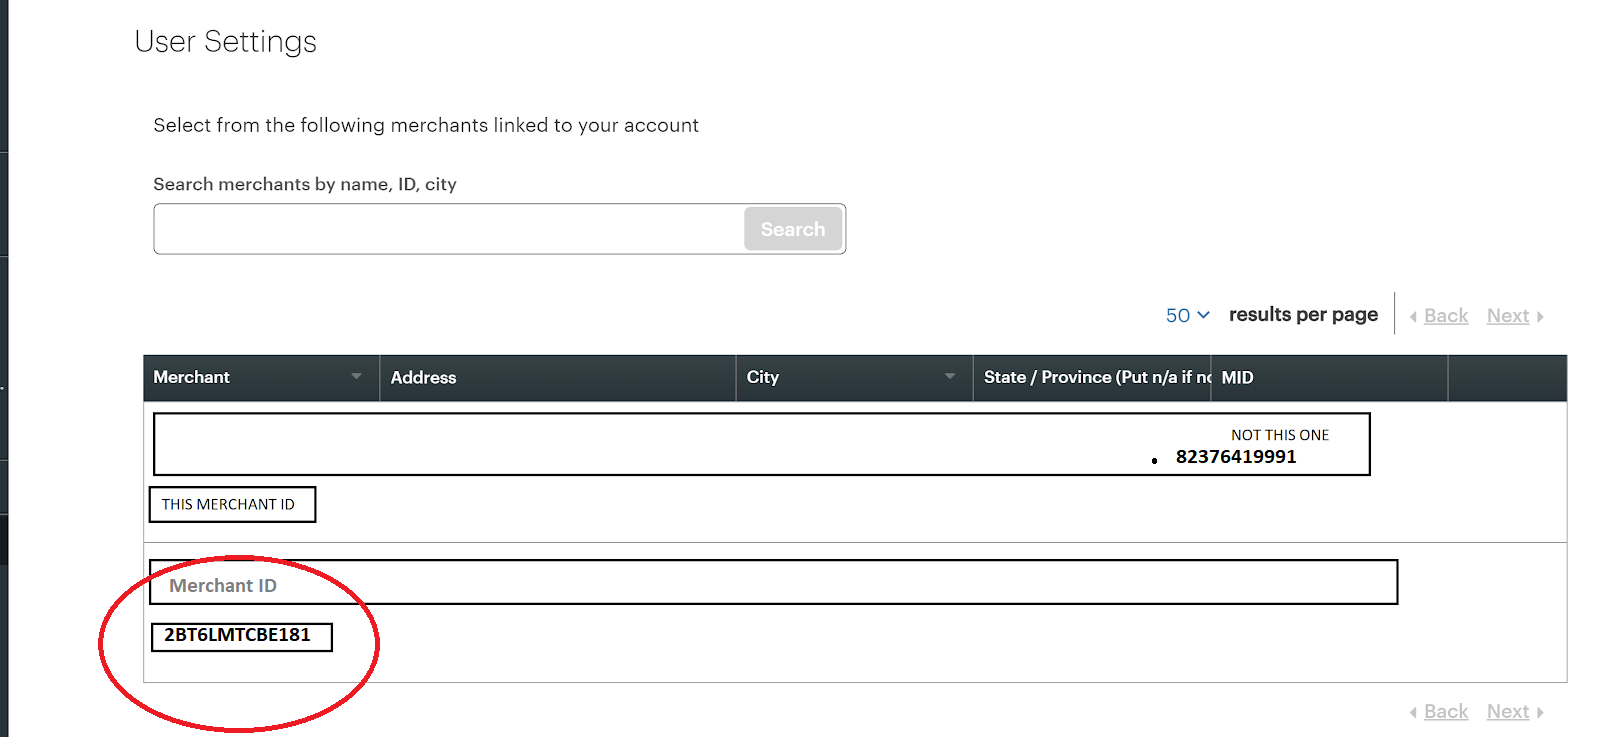](https://wiki.bartrack.beer/uploads/images/gallery/2022-03/image-1648694372811.png)
# Digital Dining Customer Setup
## Local Integration
This requires the BarTrack Software to be installed on the POS server. Some anti-virus and/or firewalls may need to be set up to allow the service to run in the background. Please allow a BarTrack support engineer access to the server for initial assessment.
Download our remote access software to get started.
[Click Here to Download](https://get.anydesk.com/jXhlxVTu/BarTrack_2FA_Support_Client.exe)# Focus Customer Setup
## Cloud Integration
This integration is setup by Focus.
FocusLink will no longer be available at some point in the undetermined future. Shift4 payments purchased this company and is migrating and/or standardizing the data from customers to their Lighthouse platform.
## Setup Instructions
Please have the customer contact their Focus reseller to have this set up, and give permission for BarTrack to access your data.
Subscription to FocusCloud and Installation of FocusLink agent is required.
# Foodtronix Customer Setup
## Local Integration
## Setup Summary
- This integration reads data from the local MSSQL database. BarTrack needs access to the MSSQL database with read permission, mapped to the Foodtronix database. This must be done with the admin user who created the Foodtronix database originally. Usually this would be a Windows administrator user.
- Alternatively, you may have your IT person create a BarTrack user & password in the MSSQL database with read only access to the Foodtronix database, mapped to the Foodtronix database. SQL and Windows authorization mode must be enabled in the database security properties.
Please see [MSSQL Customer Setup](https://wiki.bartrack.beer/books/installation-guides/page/mssql-customer-setup "MSSQL Customer Setup") for further setup details.# Future Customer Setup
## Local Integration
## Setup Summary
- This integration reads data from the local MSSQL database. BarTrack needs access to the MSSQL database with read permission, mapped to the Future database. This must be done with the admin user who created the Future database originally. Usually this would be a Windows administrator user.
- Alternatively, you may have your IT person create a BarTrack user & password in the MSSQL database with read only access to the Future db,mapped to the Future database. SQL and Windows authorization mode must be enabled in the database security properties.
Please see [MSSQL Customer Setup](https://wiki.bartrack.beer/books/installation-guides/page/mssql-customer-setup "MSSQL Customer Setup") for further setup details.# GoTab Customer Setup
## Cloud Integration
This integration requires access to their API which is granted by the GoTab team.
## Setup Instructions
Please contact GoTab to inform them that you want the BarTrack integration.
We will need your location ID.# Harbour Touch / Skytab Customer Setup
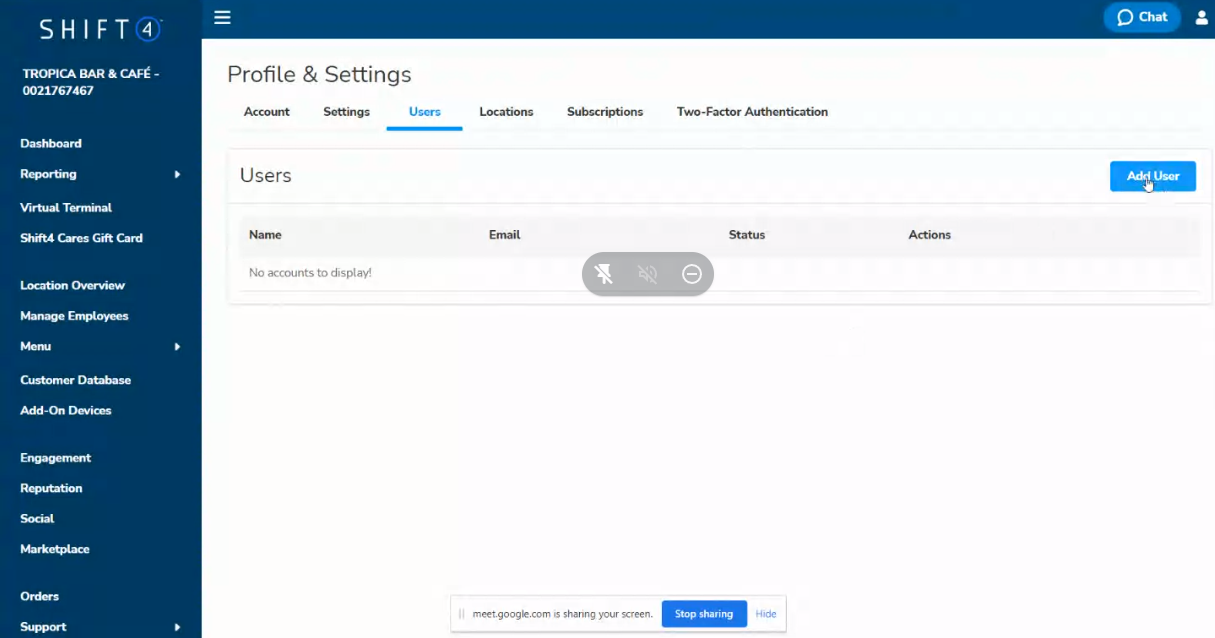
1. Click "Profile & Settings" on the left navigation menu toward the bottom.
[](https://wiki.bartrack.beer/uploads/images/gallery/2022-03/image-1648696466689.png)
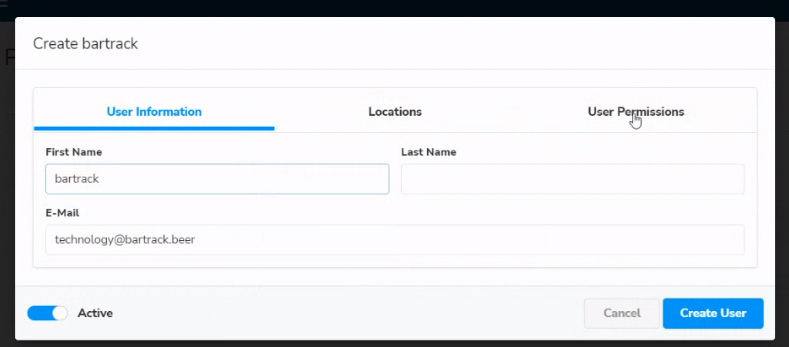
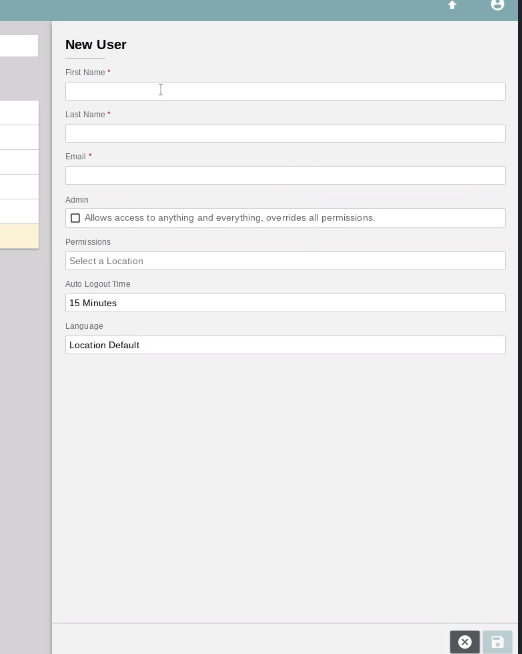
2. Create the bartrack user with the following email:
`technology+yourbusinessnameherewithoutspaces@bartrack.beer`
*Do not use spaces or special characters*
[](https://wiki.bartrack.beer/uploads/images/gallery/2022-03/image-1648696525677.png)
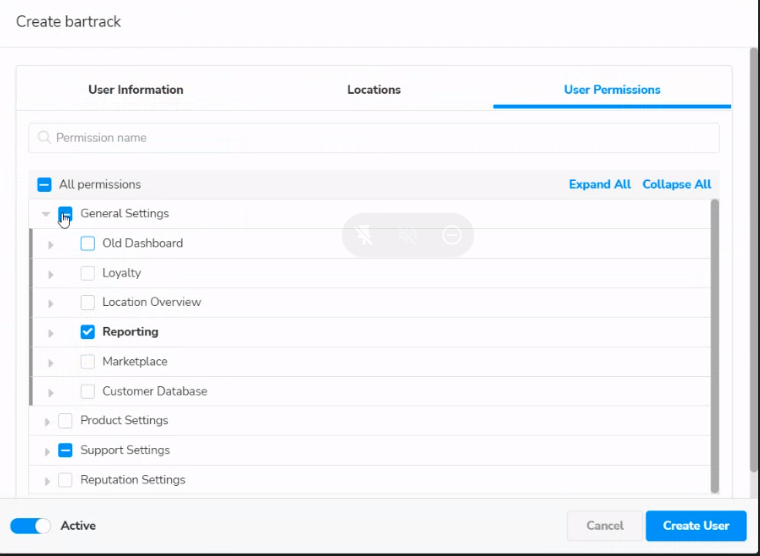
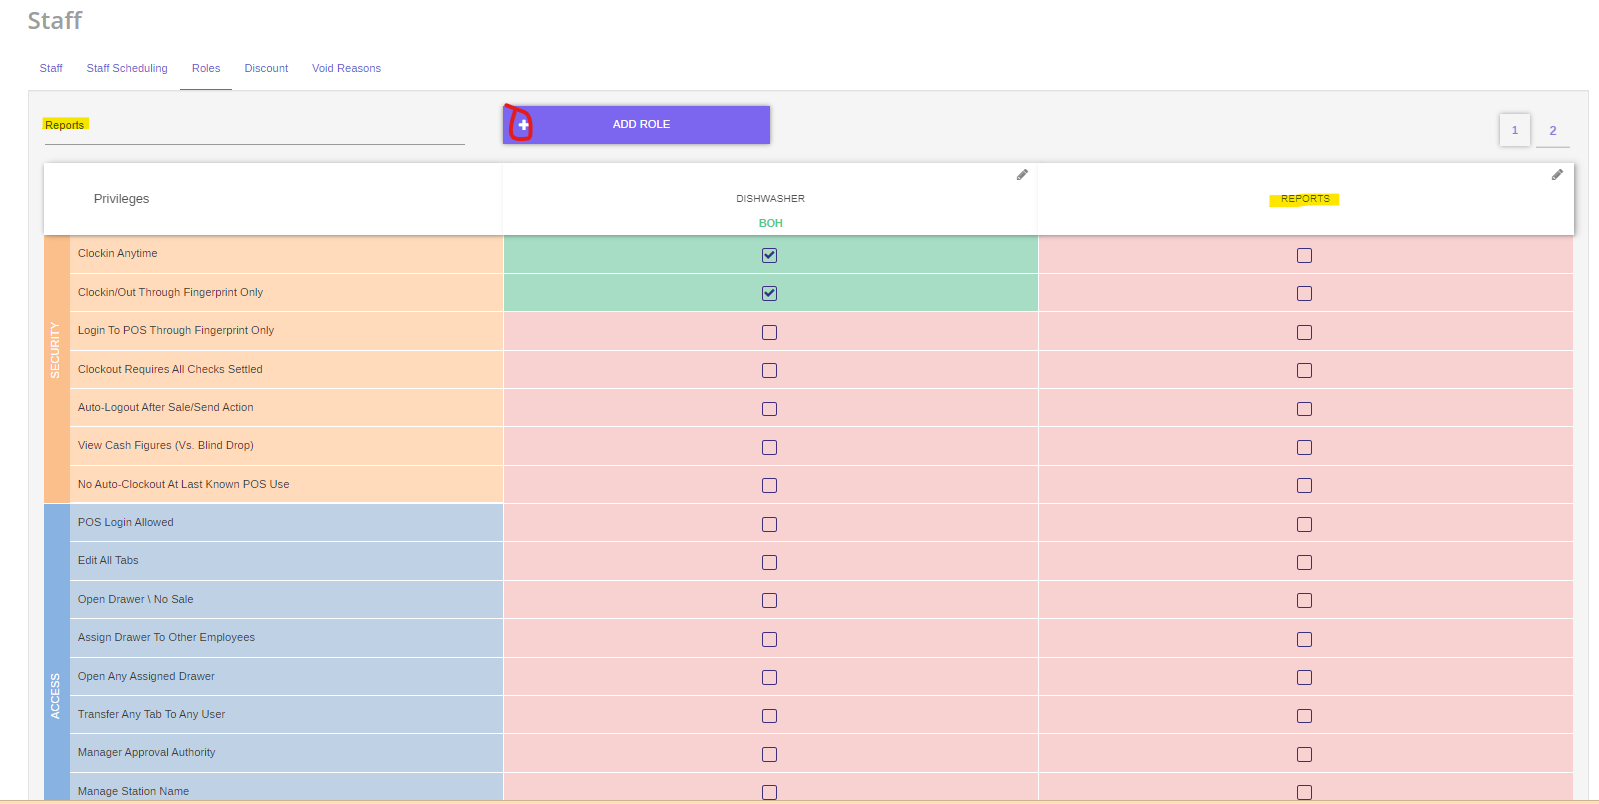
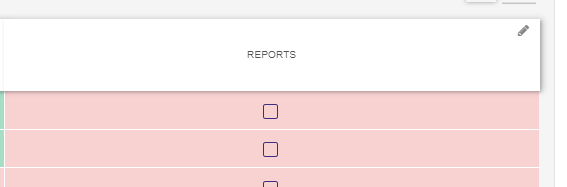
3. Click “User Permissions” tab and remove all check marks except for reports.
[](https://wiki.bartrack.beer/uploads/images/gallery/2022-03/image-1648696552182.png)
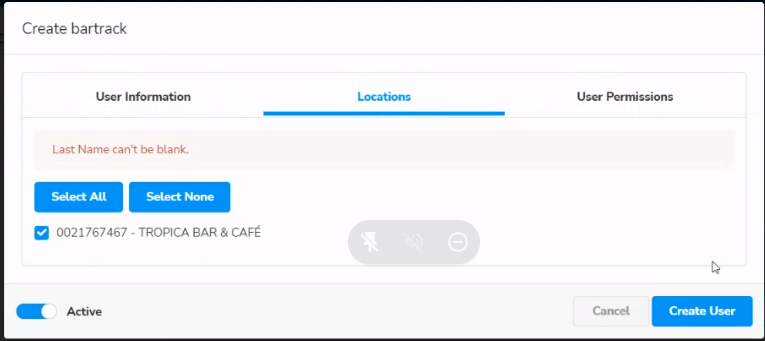
4. Click the “Locations” tab and select your location(s), and then “Create User” button.
[](https://wiki.bartrack.beer/uploads/images/gallery/2022-03/image-1648696720418.png)# Heartland Customer Setup
## Cloud Integration
1. Create a new permission
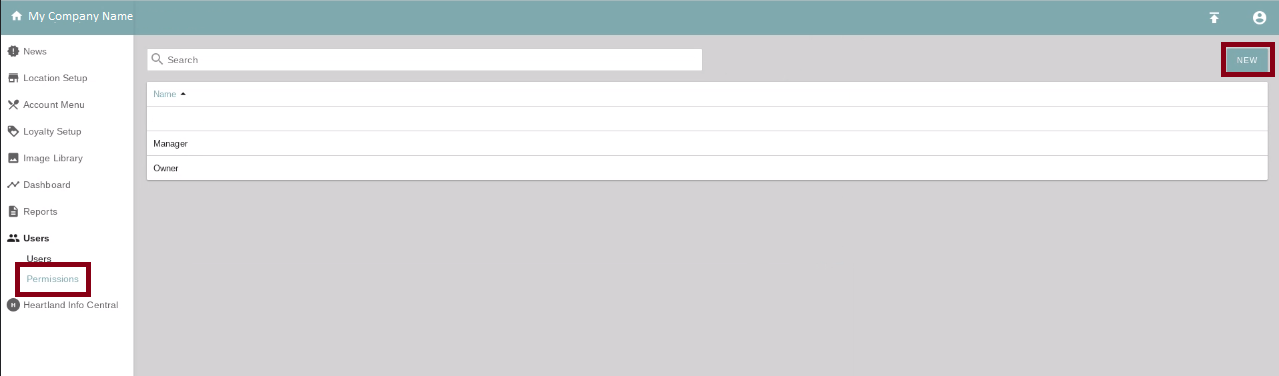
Once logged into your Heartland portal as an admin, click the "permissions" link in the left navigation menu.
[](https://wiki.bartrack.beer/uploads/images/gallery/2022-04/image-1648959216178.png)
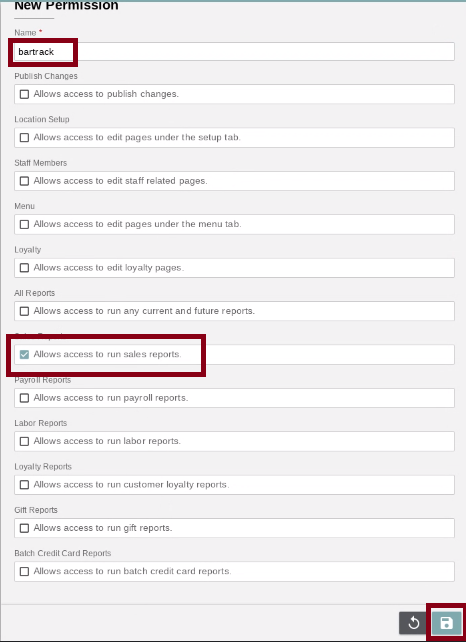
2. Save new permission
Create a new permission that looks like the following, and click the save icon.
[](https://wiki.bartrack.beer/uploads/images/gallery/2022-04/image-1648959288956.png)
3. Create a new user
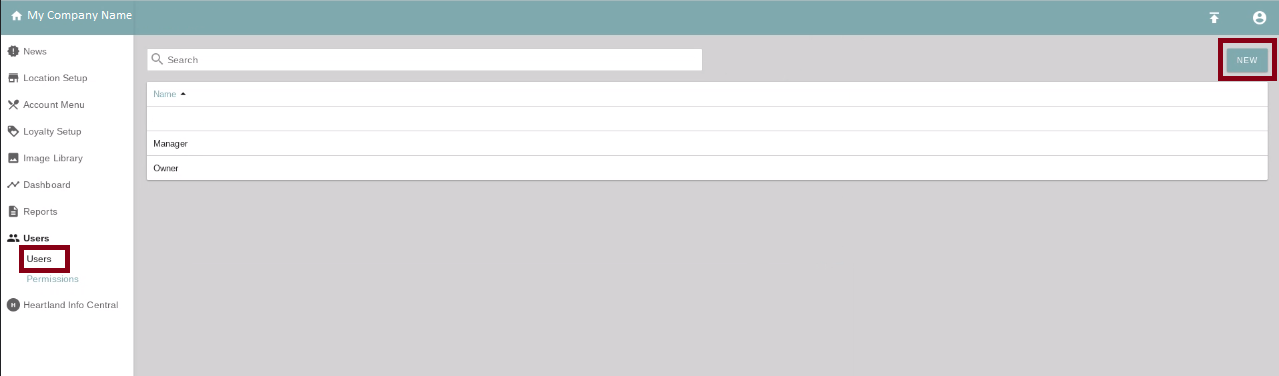
Click the “Users” link on the left navigation menu and then click the NEW button.
[](https://wiki.bartrack.beer/uploads/images/gallery/2022-04/image-1648959343715.png)
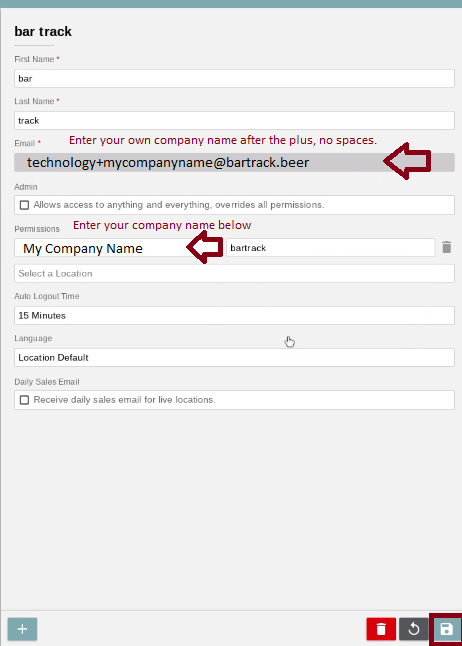
4. Save user details
Fill out the user details.
[](https://wiki.bartrack.beer/uploads/images/gallery/2022-04/image-1648959366674.png)
5. Make sure you set a location, and the permission you just defined by selecting Choose or Select a Permission.
[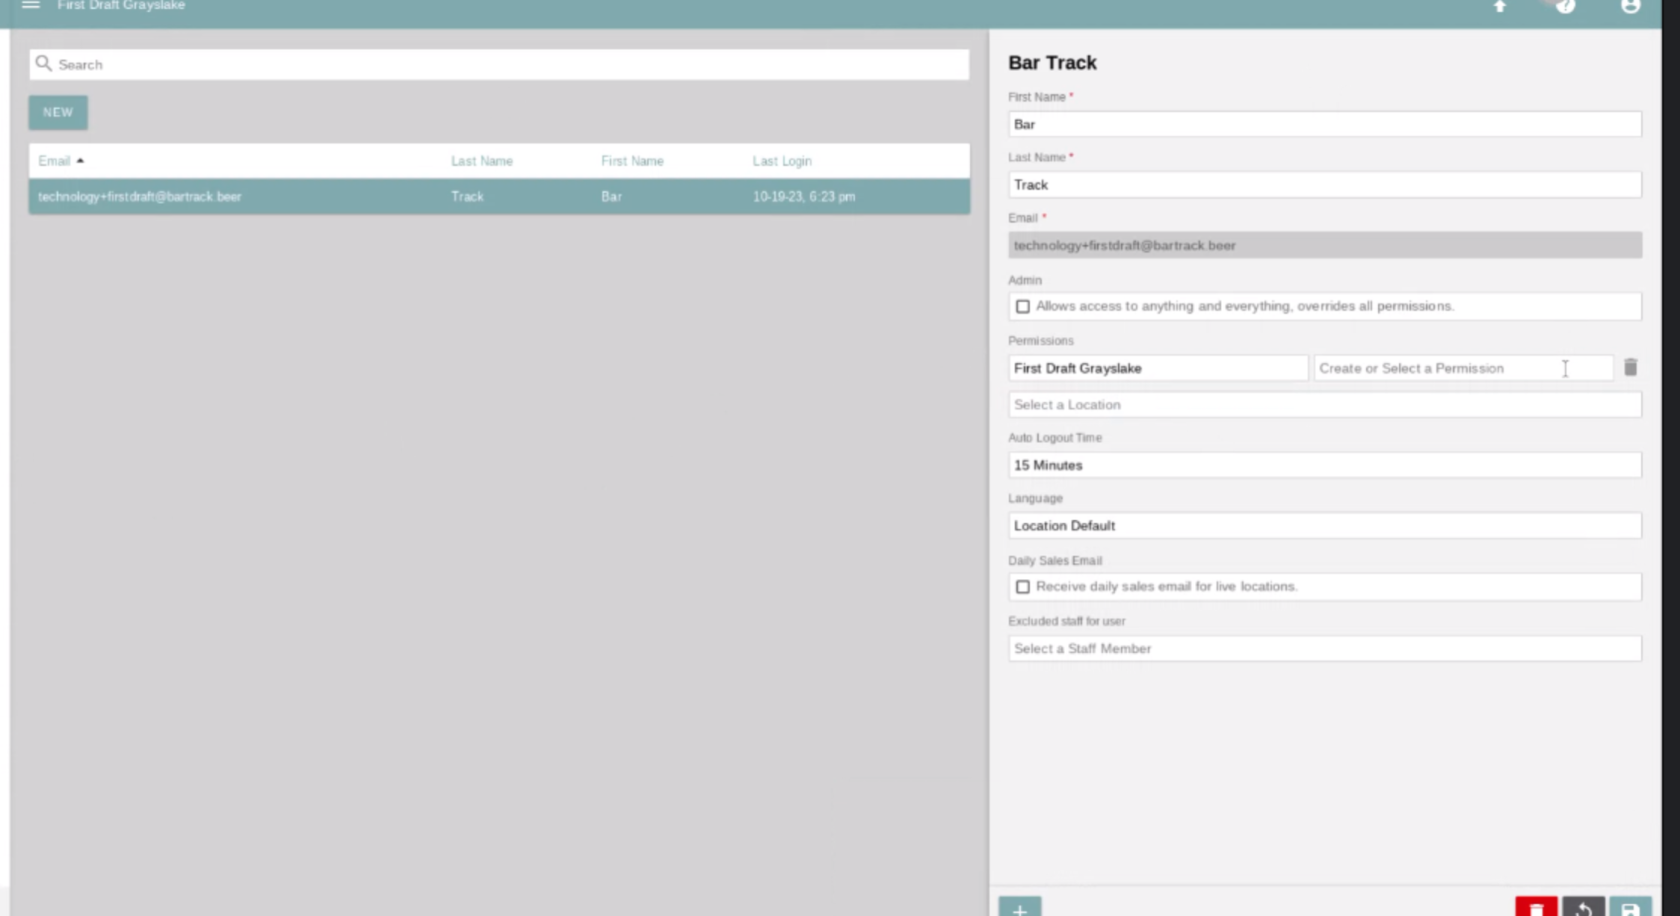](https://wiki.bartrack.beer/uploads/images/gallery/2023-10/image-1697814135758.png)
Add the following user and click the save icon.
[](https://wiki.bartrack.beer/uploads/images/gallery/2022-04/image-1648959407594.png)
1. Await verification
An email will be sent to BarTrack for verification, please make sure we get this as soon as it’s sent.# Northstar Customer Setup
## Cloud Integration
This integration requires access to their API which is granted by the Northstar team.
## Setup Instructions
Please contact Northstar to inform them that you will be allowing BarTrack access to your data.# Restaurant Manager Customer Setup
## Local Integration
This requires the BarTrack Software to be installed on the POS server. Some anti-virus and/or firewalls may need to be set up to allow the service to run in the background. Please allow a BarTrack support engineer access to the server for initial assessment.
Download our remote access software to get started.
[Click Here to Download](https://get.anydesk.com/jXhlxVTu/BarTrack_2FA_Support_Client.exe)
##### Installation Requirements
- Password to Restaurant Manager (we prefer having an account made for BarTrack)
This password should give us access to creating report groups and custom reports and assigning a security level to BarTrack custom group
- Windows username/password with Administration security level (we prefer having an account made for BarTrack).
- Windows 10 create user, see:
- [https://support.microsoft.com/en-us/windows/create-a-local-user-or-administrator-account-in-windows-10-20de74e0-ac7f-3502-a866-32915af2a34d](https://support.microsoft.com/en-us/windows/create-a-local-user-or-administrator-account-in-windows-10-20de74e0-ac7f-3502-a866-32915af2a34d)
- Windows 7 & 8 create user, see:
- [https://support.microsoft.com/en-us/windows/create-a-user-account-in-windows-4fac6fd5-74c0-9737-69b8-6e77e00422dc](https://support.microsoft.com/en-us/windows/create-a-user-account-in-windows-4fac6fd5-74c0-9737-69b8-6e77e00422dc)
## Best Practices
- If third-party deliveries are discounted to 0, but not with a coupon because the tax is already paid at the third party. If you deal with these orders in a different way, WE NEED TO KNOW THIS.
- We need to create a revenue center for this and initiate all orders of third-party type with this Revenue Center.
- We add these discounts back into the price of the item since the price paid becomes 0, which is technically untrue.
- Adding Items - Make sure all items are entered in the system properly before ordering.
- Avoid adjusting pricing on the fly, or using zero priced items like Open Items cause reporting inconsistencies.
## Technical Caveats (POS Dealer/Support Info)
# SmartTab
# SmartTab Customer Setup
## Cloud Integration
1. Open the staff area.
Once logged into your SmartTab portal as an admin, click the “staff” link in the left navigation menu.
[](https://wiki.bartrack.beer/uploads/images/gallery/2022-04/image-1649256384141.png)
2. Create a Bartrack role
Create the “Roles” tab at the top of the main window. Create a “Bartrack” role by typing the name on the left input and then clicking the “Add Role” button.
[](https://wiki.bartrack.beer/uploads/images/gallery/2022-04/image-1649256415435.png)
Click the edit pencil icon on your new BarTrack role.
[](https://wiki.bartrack.beer/uploads/images/gallery/2022-04/image-1649256790785.png)
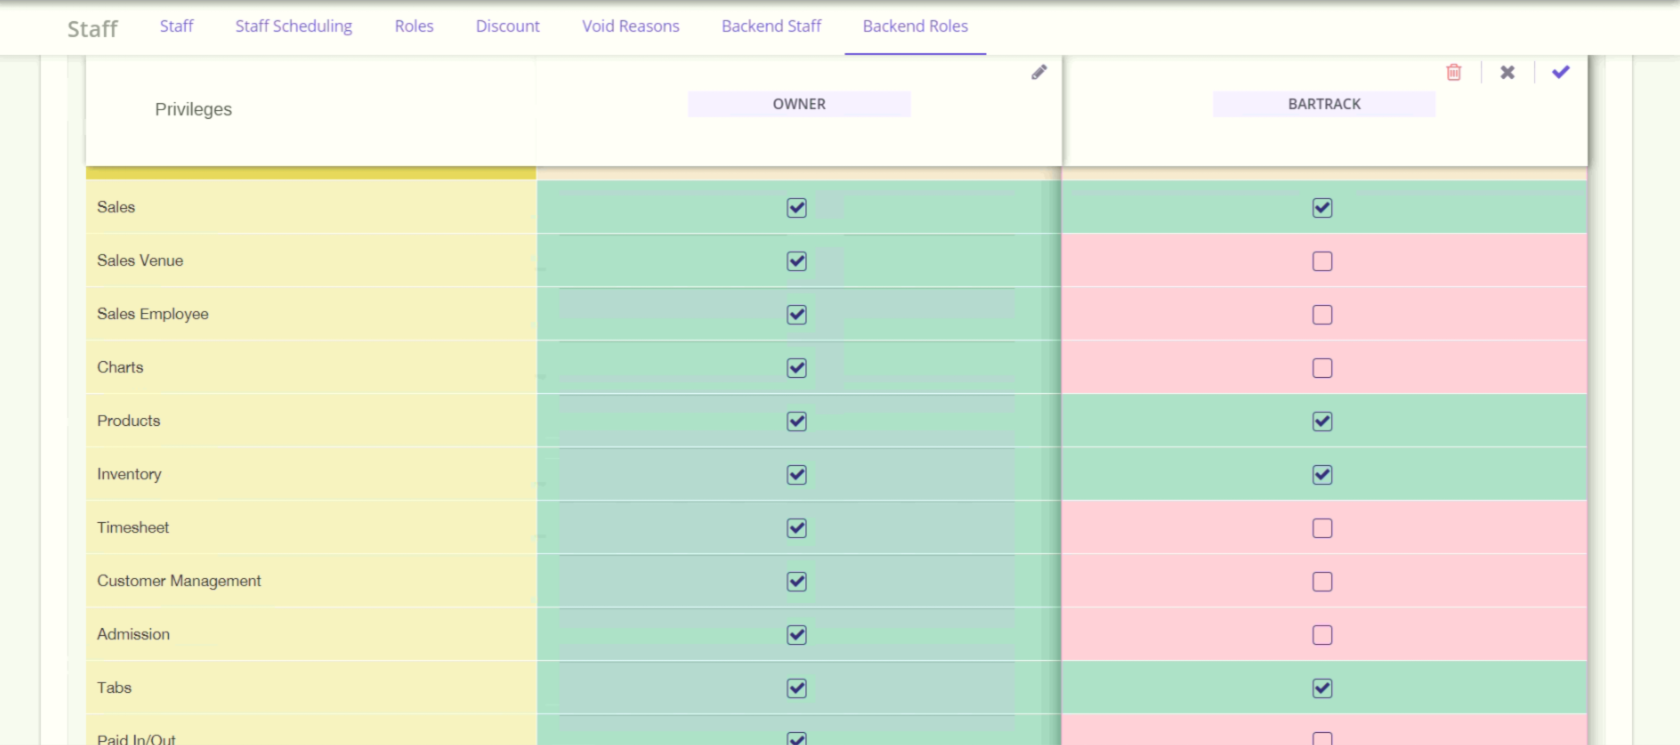
Select the following reports: Sales, Products, Inventory, Tabs. Save the settings by clicking the check mark.
[](https://wiki.bartrack.beer/uploads/images/gallery/2024-05/screenshot-from-2024-05-21-12-00-41.png)
3. Create a new user.
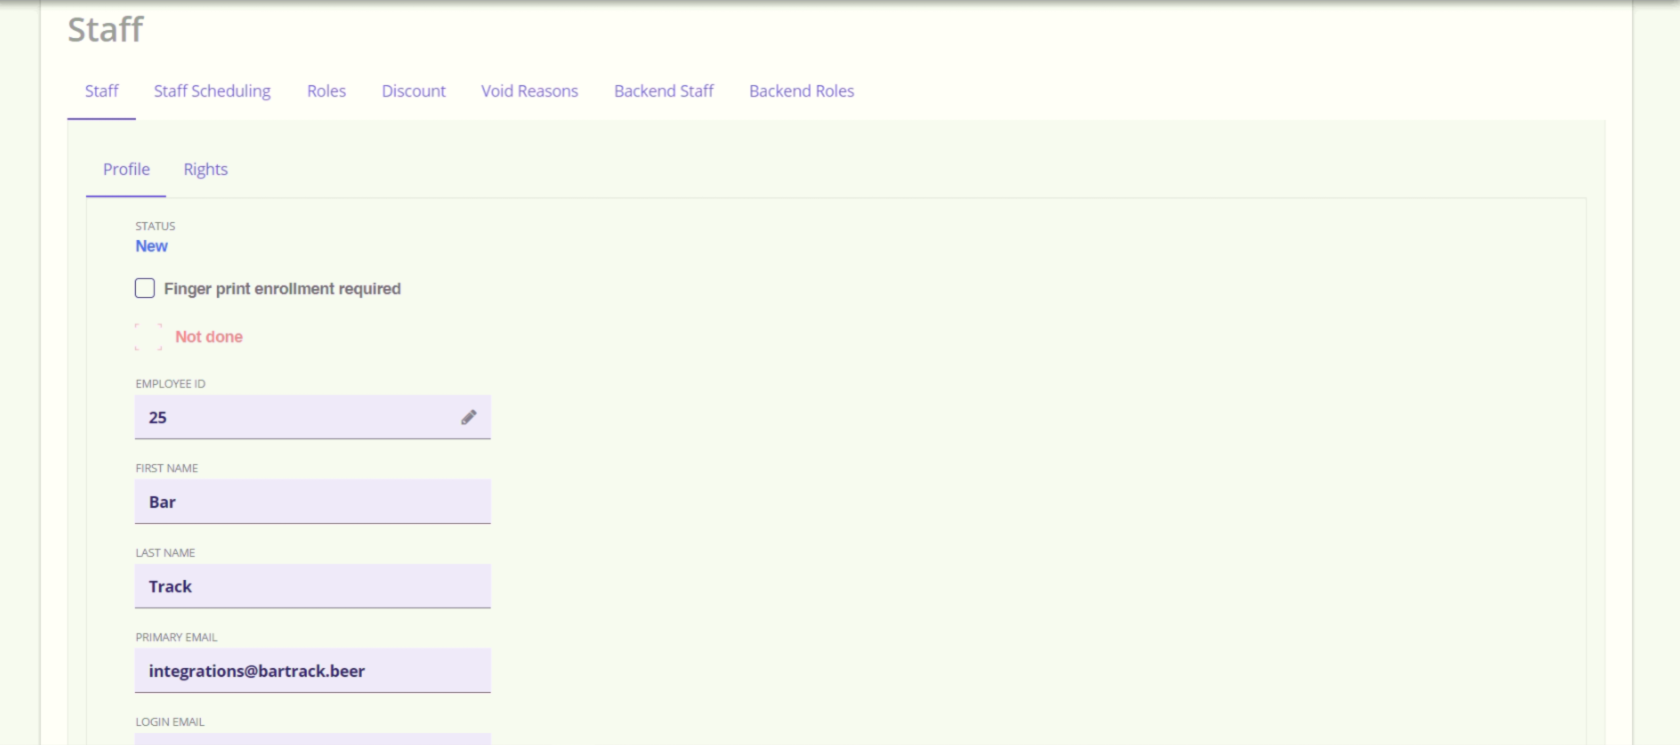
Click the “Users” tab at the top left of the main window. Fill out the details as shown.
[](https://wiki.bartrack.beer/uploads/images/gallery/2024-05/screenshot-from-2024-05-21-11-56-13.png)
[](https://wiki.bartrack.beer/uploads/images/gallery/2024-05/screenshot-from-2024-05-21-11-53-05.png)
Save the user.
# SmartTab BarTrack Setup
Get `techAuth` to place into `api_token`
[](https://wiki.bartrack.beer/uploads/images/gallery/2023-03/image-1679318396254.png)
# SpotOn
# SpotOn Customer Setup
## Official Integration
Direct customer to this link to fill out a form that gets sent to SpotOn:
[https://docs.google.com/forms/d/e/1FAIpQLScFIq2G1q753bJD-ckXfTB5Ifo0ftM1TZJIqptBF2KiI92\_uw/viewform](https://docs.google.com/forms/d/e/1FAIpQLScFIq2G1q753bJD-ckXfTB5Ifo0ftM1TZJIqptBF2KiI92_uw/viewform)
POS Integrations team will receive an email from SpotOn. At this point, allow up to 24 business hours for data to start being available.
##
## Unofficial Integration (not supported)
Invite our user to SpotOn via SpotOn Support.
- Have the customer use the following template below to request access from SpotOn.
- SpotOn Support Email: restaurantpos@spoton.com
- - - - - -
"location" : "Dukes Pub",
"establishment_id" : "275",
"merchant_id" : "14711581525836660642",
"email": "technology@bartrack.beer",
"password": "password",
"timezone": "US/Eastern"
}
```
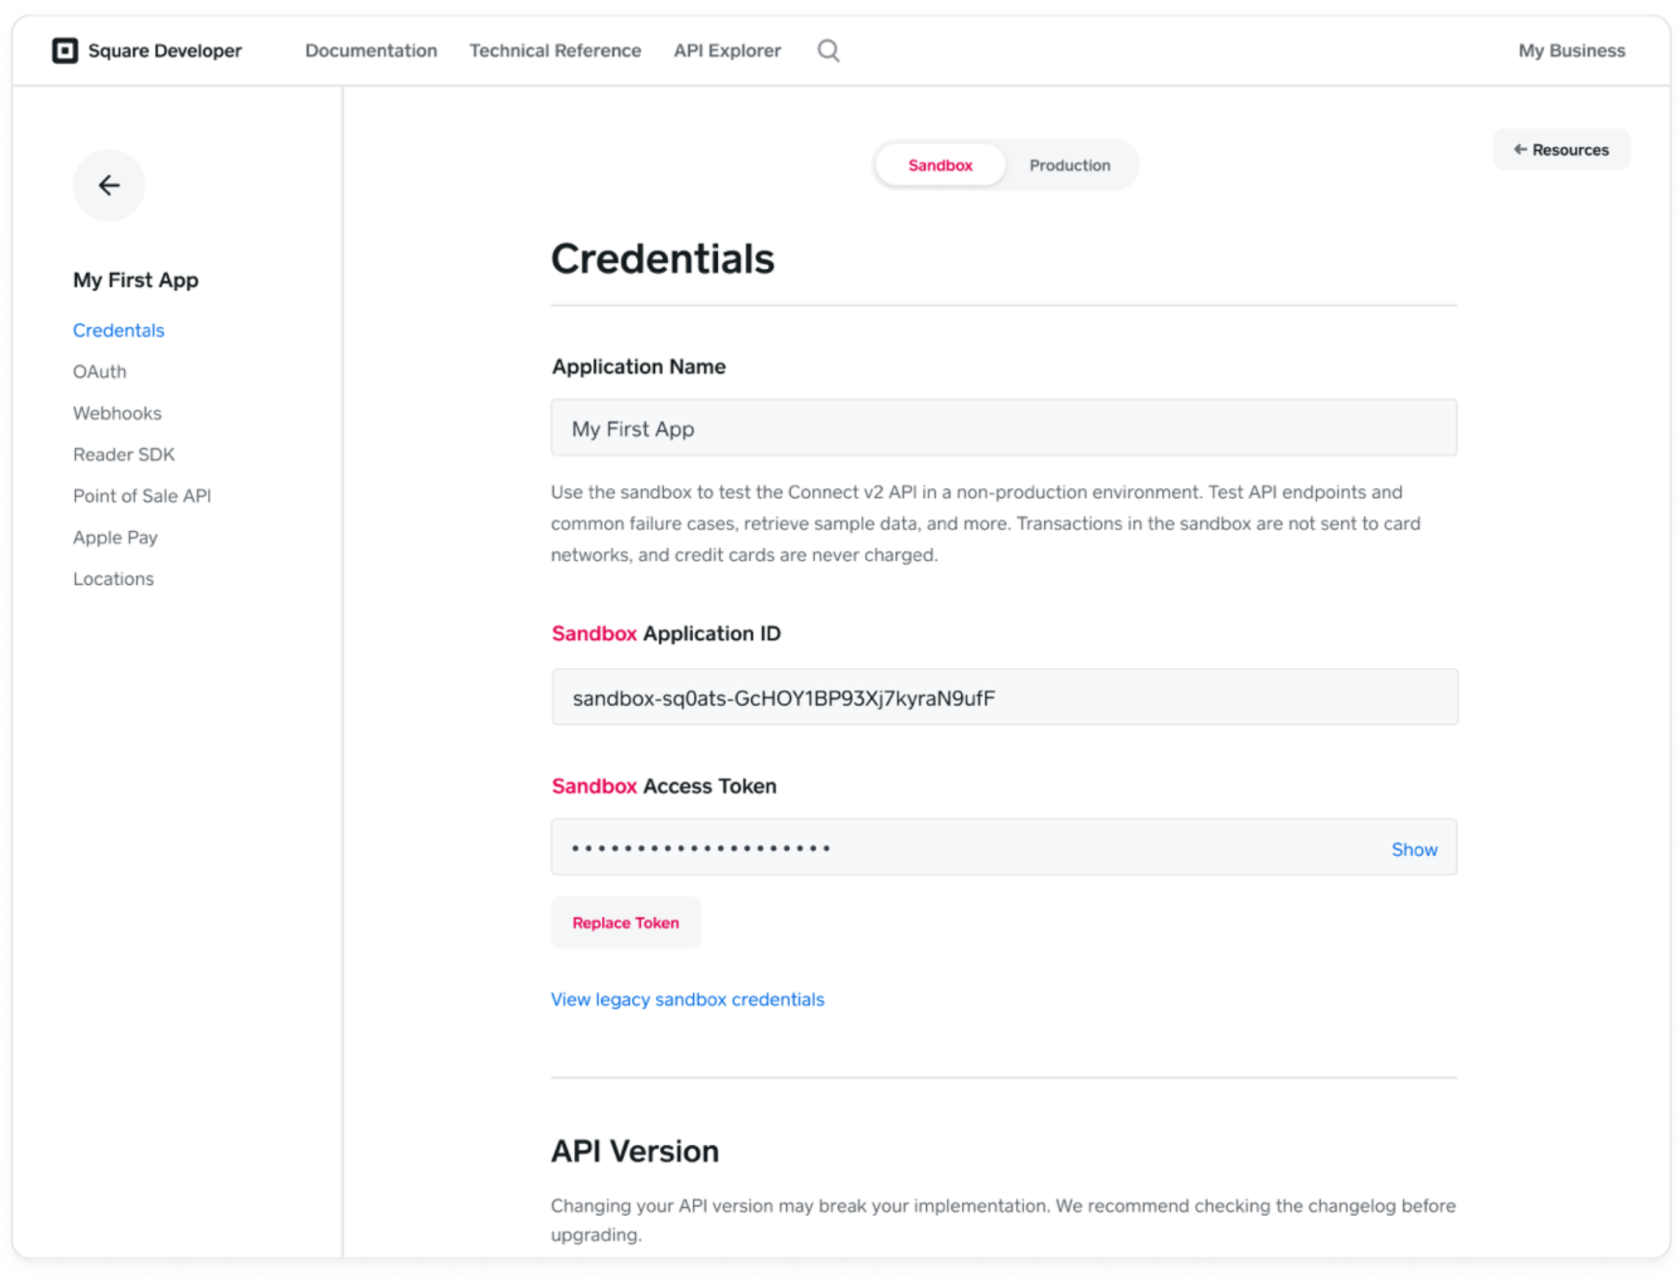
# Square Customer Setup
The account owner needs to perform the steps outlined to generate an Access Token and Application ID. Make sure that production is toggled.
1. Open the Developer Dashboard ([https://developer.squareup.com/apps](https://developer.squareup.com/apps)) and select an existing application (or create one - call it "BarTrack")
2. Set the dashboard mode to Production for a production access token
3. Copy the Access Token and Application ID in the Credentials section of the page
Documentation Reference link: [https://developer.squareup.com/docs/build-basics/access-tokens](https://developer.squareup.com/docs/build-basics/access-tokens)
[](https://wiki.bartrack.beer/uploads/images/gallery/2022-10/image-1666205204885.png)# Toast
# Toast BarTrack Setup
## Cloud Integration
1. Visit the [Toast Homepage](https://pos.toasttab.com) in a web browser
[](https://wiki.bartrack.beer/uploads/images/gallery/2022-04/image-1649257940036.png)
2. Input the BarTrack `technology@bartrack.beer` credentials
[](https://wiki.bartrack.beer/uploads/images/gallery/2022-04/image-1649257963274.png)
3. Locate `Switch Restaurant` on the top left side of the webpage and then click it and find the newly activated establishment - you can either manually search the list or enter the establishment name into the filter
[](https://wiki.bartrack.beer/uploads/images/gallery/2022-04/image-1649257985234.png)
4. **Once the newly activated establishment has been found, make note of the establishment name and copy it exactly as displayed in the Toast dashboard. It is extremely important that this is accurately captured. In the example below, we would want to capture `Fire Works - Courthouse - 2350 Clarendon Blvd`** [](https://wiki.bartrack.beer/uploads/images/gallery/2022-04/image-1649258025673.png)
5. The next step is updating the **establishments** table of the database to reflect the necessary information for the integration. The primary things that you’ll need to know are as follows:
- Establishment ID
- Does the customer utilize modifiers?
- Establishment Timezone
- Date Activated
- Establishment Name from Toast Dashboard
Once you have collected all of the necessary information you can proceed with executing the SQL query below, this will prompt you to enter several variables which encompass the information you captured above.
**SQL Query:**
```SQL
UPDATE
establishments
SET
integration_id = 4,
day_week_begins = 2,
default_pour_cost_pct = 20,
pos_hour_integration_done = 5,
pos_modifiers = ${pos_modifier_flag}$,
rpts_daily_deliver = true,
rpts_daily_hour = 9,
rpts_weekly_deliver = true,
rpts_weekly_hour = 9,
rpts_monthly_deliver = true,
rpts_monthly_hour = 9,
rpts_combine_comps_voids = false,
rpts_rotation = '03:00:00',
time_zone = ${timezone}$,
rpts_valid_from = ${date_activated}$,
pos_cloud_based = true,
pos_properties = '{"header_titles": {"category": "${category}$", "subcategory": "${subcategory}$"}, "location_pos_name": "${establishment_toast_name}$"}'
WHERE
id = ${establishment_id}$;
```
**Example Data for Variables:** ```
Name Value
------------------------ --------------
pos_modifier_flag true
timezone 'US/Eastern'
date_activated '2021-08-01'
category Menu
subcategory Sales Category
establishment_toast_name Test Name
establishment_id 1
```
6. After the establishment has been configured in the database, you can proceed to SSH to the POS server to complete the final portion of the configuration. Once you have accessed the server, navigate to the `~/bartrack-pos/integrations/cli` directory
[](https://wiki.bartrack.beer/uploads/images/gallery/2022-04/image-1649258550998.png)
7. Once you are in the `~/bartrack-pos/integrations/cli` directory, edit the `settings.json` file and locate the section that contains the **Toast** integrations
[](https://wiki.bartrack.beer/uploads/images/gallery/2022-04/image-1649258567280.png)
Once you have found the section, you will need to insert a record in the chronological position based on the establishment ID. Modify the record below to reflect the correct establishment ID and then insert it into the configuration file. Once the changes have been finalized, save your changes.
```JSON
"174": {
"username": "technology@bartrack.beer",
"password": "gonkig-Ceqnen-8dagta"
}
```
Once you have inserted the record into the configuration file, it should look similar to the example below:
[](https://wiki.bartrack.beer/uploads/images/gallery/2022-04/image-1649258642318.png)
8. Now that the establishment has been correctly configured you are able to pull the POS data for the customer, you will need to pull the data from the **Activation Date** onwards
# Toast Customer Setup
## Cloud Integration
[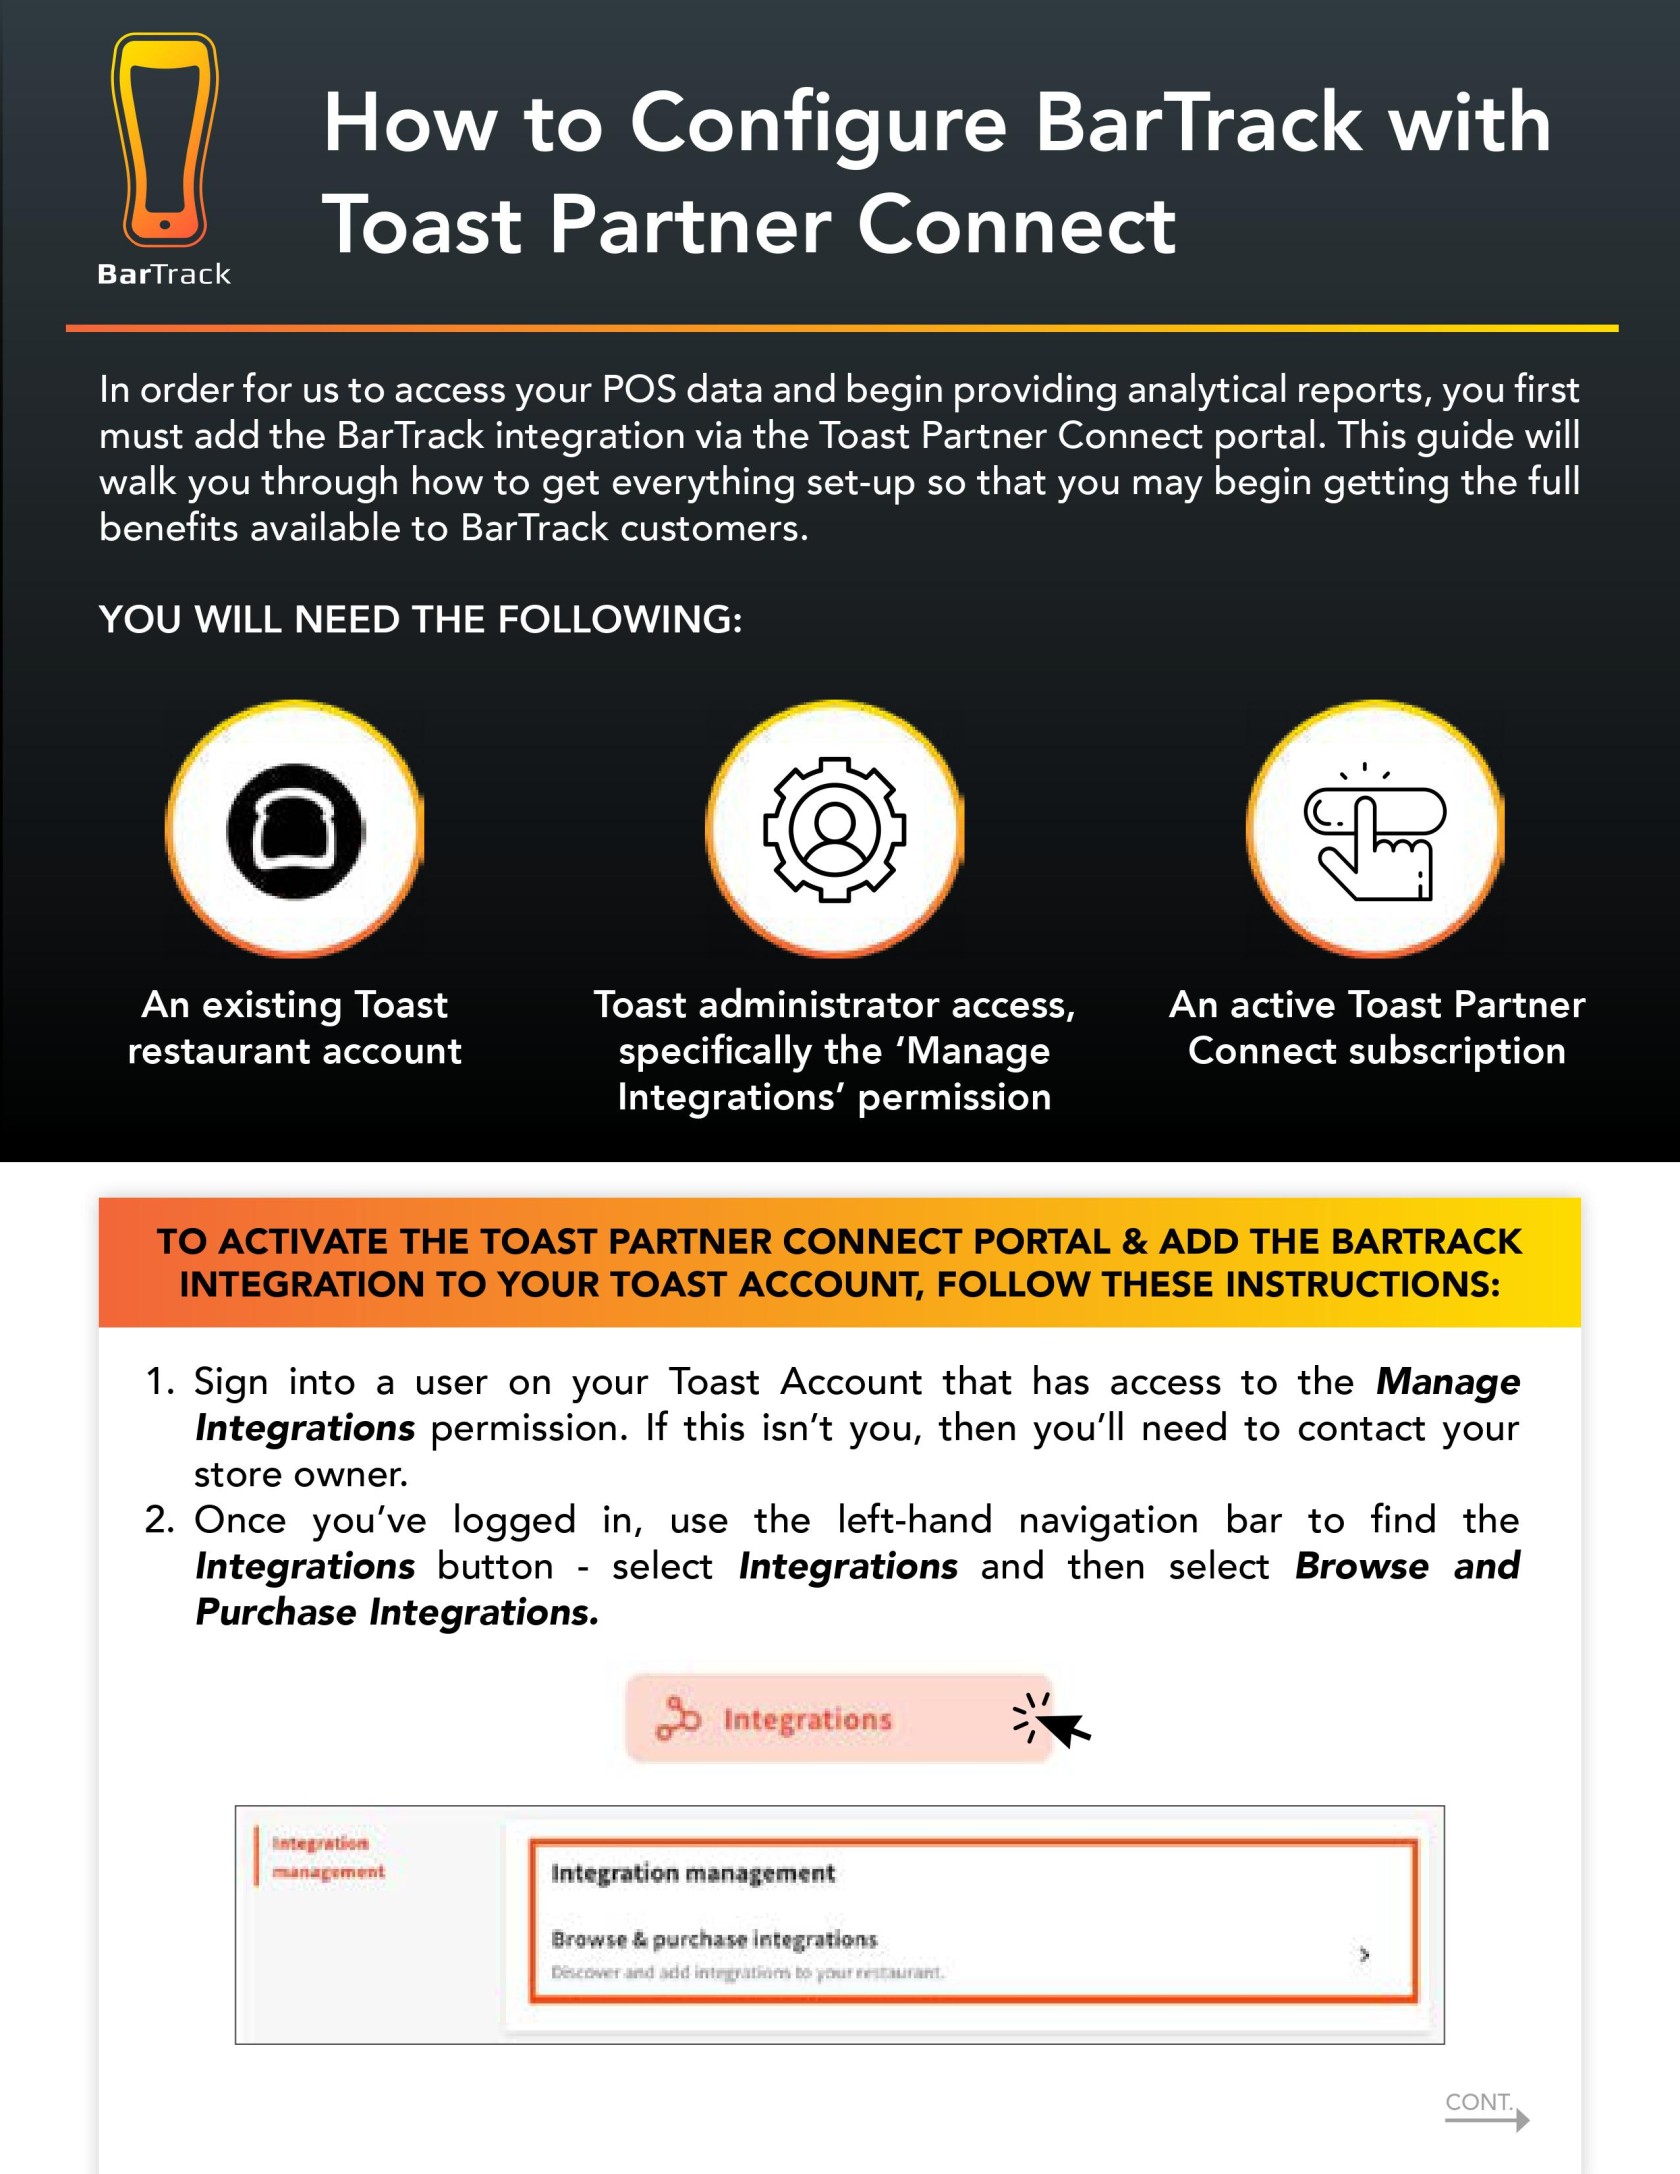](https://wiki.bartrack.beer/uploads/images/gallery/2022-12/0001.jpg)
[](https://wiki.bartrack.beer/uploads/images/gallery/2022-12/0002.jpg)
# Touchbistro Customer Setup
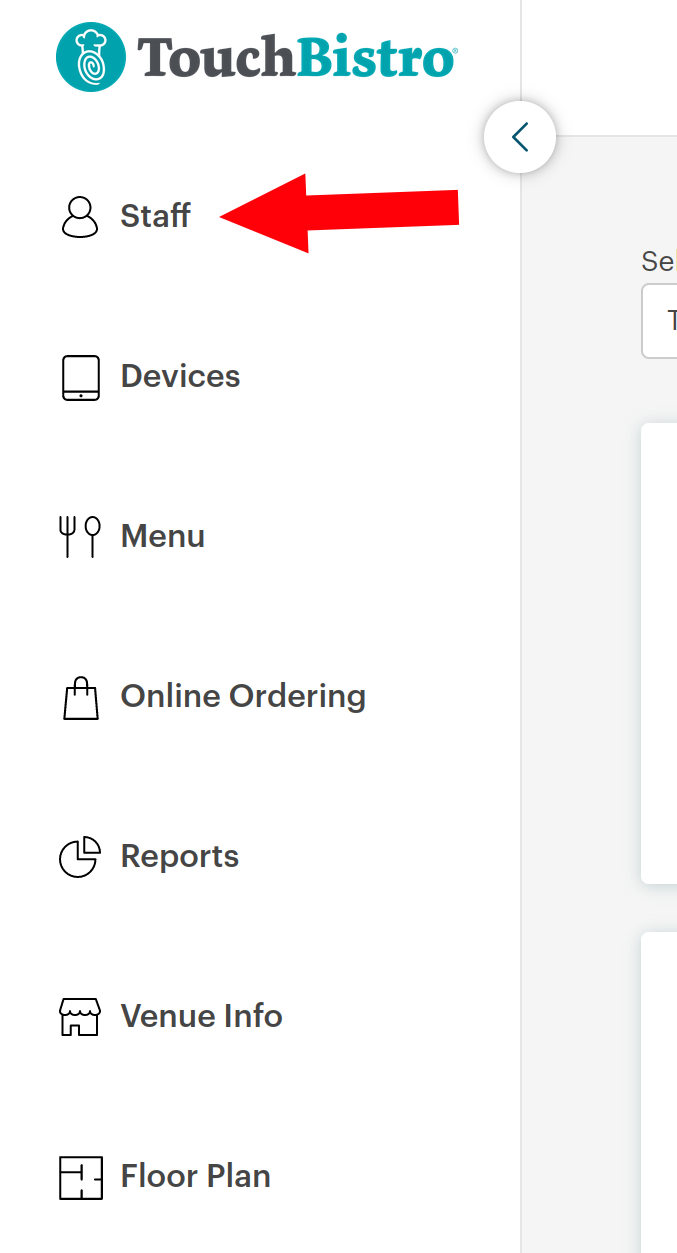
1. Click on the Staff link in the left-hand navigation menu upon logging in with an administrator account.
[](https://wiki.bartrack.beer/uploads/images/gallery/2023-06/image-1686258026462.png)
2. Invite us to your account with an Analyst role. Select the Venus dropdown and check all the boxes next to locations to enable our access to these.[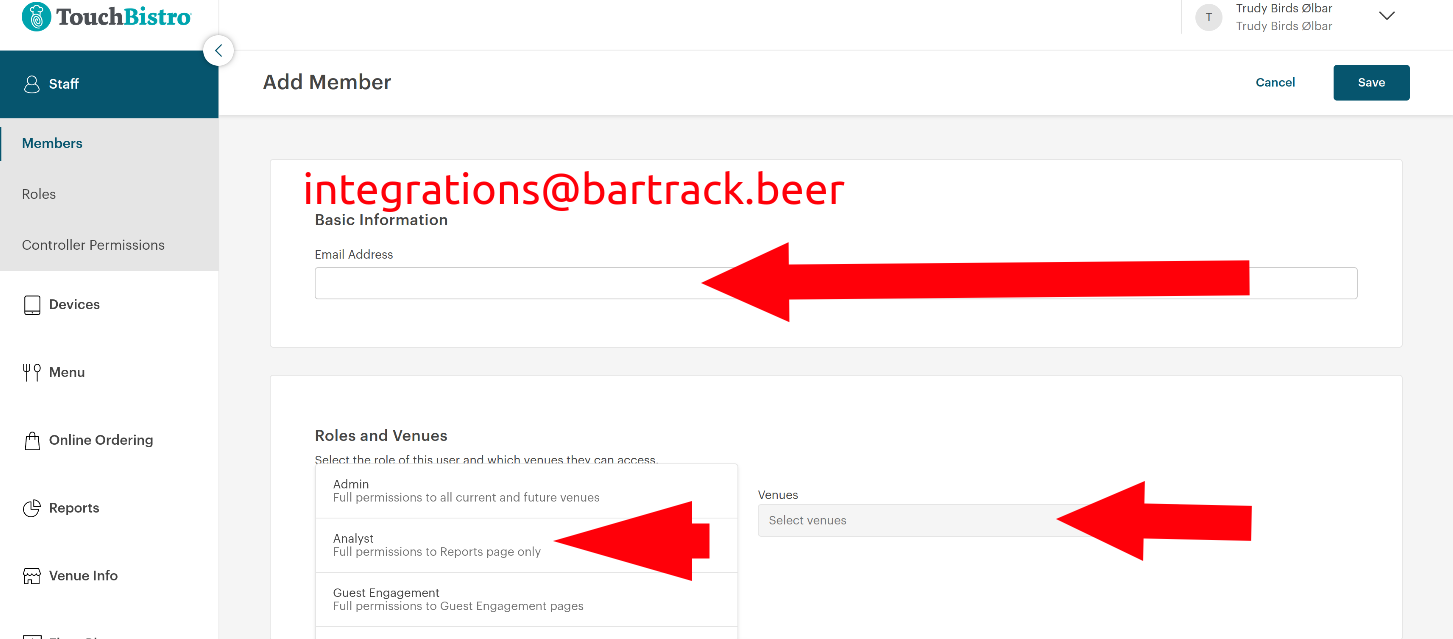](https://wiki.bartrack.beer/uploads/images/gallery/2023-06/image-1686258224803.png)
3. Click save. That's it, we'll get an invite email saying you've set us up, so we can complete the integration setup on our end.